Sunday, September 28, 2025

Two Workshops!


Earlier this summer, I taught my second Menagerie workshop at the Minneapolis Textile Center


We had a full class and it was loads of fun. I'd done most of the conceptualizing while preparing for that inaugural workshop in November, along with ironing out kinks in the flow of activity, all of which are par for the course when conducting any lesson thing for the first time. There were twice as many participants this time around, but even though my actual prep work was doubled, it still felt more relaxed, with far fewer unknowns, so it was an overall wonderful experience. 

I also found myself with some time before the participants arrived to take pictures!

Here are the workstations.


The outcome of the workshop was to make a sampler animal, in the process practicing (or learning for the first time) various techniques for adding surface details with applique and quilting-stitching, and making and attaching different appendages within seams. 


It doesn't look like anything you'll have seen in nature thus far, but that's not to say an animal this multicolored might not exist in some far-flung corner of the world we've never had a chance yet to visit, right? My reasoning behind the colors (14!) was purely visibility and clarity - differently-colored parts showed up less ambiguously in photos, and were easier to visualize spatially in the various reference animals set around the room.


Everything that needed to be cut out, from templates to fabric pieces, was done so ahead of time, to allow the participants to focus on simply sewing during our time together. This translated to a lot of physical labor on my part in the weeks leading up to the workshop day, but it was worth it to be able to use our workshop hours truly efficiently.


There were lots of other notions spread out among the participants, including the long funnels for directing pellets down into small spaces. I designed this a long time ago for doll legs and called it The Contraption - the ones in the photo are sturdier, less improvisational versions of that prototype, and the participants each got to take one home. 


This was my table up front. I love the giant monitor that projected a view of my workspace! That said, even with this nifty bit of technology, I spent very little time actually up front teaching and instead wandered around the room doing personalized demos because everyone was mostly progressing at their own pace and needed help at very different times. There were aspects of this experience that reminded me of labwork when I was a school teacher - very much more a facilitative kind of instruction than lecture-and-keep-up.


Emily came to help me set up in the beginning, so if the room displays look put-together and intentional, it was to her credit. And it was also for this reason that I had that extra bit of time to take these photos before the class began.


We brought a large number of my prototypes from home - some are the familiar faces of the first Menagerie pattern


and others are newcomers who will be in the sequel.


We also brought the Spring Birds collection - the birds, the kits and the pattern-in-print.


Sharing the table were the classroom kits of the Rabbit, Ladybug, Grey Cat and Calico Cat. After completing their sampler animal in class, the participants got to pick one of these four kits to assemble on their own during the remaining time.


Speaking of, they were kind enough to allow me to take and share photos, so here are some shots of the class hard at work. 


In this shot, someone's sampler animal was really close to being finished!


When I've made the sampler animal myself at home and timed the process, it usually takes me about an hour and a half; perhaps two if I am also pausing to photodocument each step. However, most of the participants ended up using the entire workshop time to work on just their sampler animal, and took their choice kits home to work on. In class, there are so many factors that stretch that time out to the full four hours - or longer. Obviously, the learning process is a huge one - it takes time to read and digest instructions, for example. Temperamental sewing machines were another. Almost every participant had an issue with their machine handling fleece, although I'm happy to report that most were resolved by giving them a fleece needle. My old Pfaff has been able to sew through multiple layers of fleece with standard needles for years without issue, so it took me a while to figure out that an ineffectual needle might possibly be the problem for the frustration being experienced in class that day. Sometimes the simplest solution is the truly the best one! 

I thought I'd mention this here in case some of you have had the same issue with fleece - if so, try a fleece needle, or just any stretch or even knit ball-point needle. You wouldn't imagine that fleece is in the same category of fabric as a T-shirt, but it strangely is. It's only recently that I've begun to notice specific Fleece Needles in stores - they're essentially stretch needles, as I'd mentioned earlier, but labeled for fleece. Maybe enough people have had difficulty with this that Schmetz has finally decided to market these specially. 

I would love to run a third Menagerie workshop next summer if there is interest. If you're in the cities and missed the earlier two, look out for announcements here and on Instagram (I'm trying to post more regularly there!) In the meantime, let me tell you about my second workshop that's coming up in October. It's all about sleeves and armholes and how to put them together so they fit well and are comfortable.


You guys know I am obsessed with deconstructing drafting and trying to demystify it for regular folks who haven't done fashion courses or interned on Saville Row or wherever. But to teach a full drafting course just isn't feasible - it takes too long, and I honestly believe a person would need a lot more experience in real-world drafting for a very wide range of bodies to bring what is truly helpful to teach such a class. I have drafted for many years, yes, but mostly for people in my family, and sporadically, at that. 

Sleeves, however - one particular, niche aspect of drafting - I thought I might realistically attempt. I've deconstructed the theory to some degree in this now-somewhat-well-referenced post, and I've inferred from the response that the information has filled a gap in the content currently out there. I'd like to take that theory a step further in this workshop with a hands-on portion in which we'd measure a partner and draft a sleeve from those measurements. The plan is not to use the usual drafting textbook rubrics but to freehand the drafts, the way I've always done them, using sleeve theory principles together with customized preferences. It will be rule-breaking and dangerous! Haha! No, not really. My goal is liberation from the rigid Hows by providing some Whys, and if I can reduce someone's frustration in the drafting experience, I will have been successful.

Anyway, if you're in the cities and are interested in drafting more comfortable sleeves, come join us! Half of the time will be a lecture-of sorts, but I will bring lots of props for show-and-tell, like multiples of this crazy vest that I'm fine-tuning. 


Because there was no one here to accurately measure me, I had to use as my starting point my most recent sloper, which was still 13 years old and had to be heavily modified to fit current-me. The plan is to graft on differently-drafted sleeves to demo various effects: high sleeve cap, low sleeve cap, large armholes, small armholes, etc. I foresee myself repeatedly zipping and unzipping myself in and out these throughout the afternoon. It will probably be chaos. The participants will probably think I'm insane. So be it. It won't be the first time someone thought that. At the end of our time together, I hope to make them feel comfortable with their own bodies, so they don't so much focus on all the ways they depart from the commercial standard as leave feeling that there's a sleeve cap for each gloriously unique arm that's in my classroom that day. 

Register here

Some quick details:
Date: Thursday, October 16th 2025
Time: 2- 4 pm
Place: Minneapolis Textile Center

I hope to see you there!


Monday, September 22, 2025

Random Upates


Hey, everyone!

Hope your summer was a wonderful one. We moved one more child into college at the end of August, so we now have two at the Uni, although the oldest is now commuting from home. One out + one in = no net change, and yet so much has and will continue to shift and evolve. The youngest is a senior in high school, so I am subconsciously preparing my heart for the transition after. I could've sworn that it wasn't that long ago that I was blogging about their little-kid adventures, the manic birthday parties, the library craft fairs and Halloween costumes. And now, here we are on this side of the parenting experience, and the grass - as the proverbial saying goes - is not so much a different shade of green as it is an entirely different landscape altogether.

I've missed being in this space. I used to think my time was fragmented before, as a mother of toddlers and newborns and elementary school kids just discovering their appetites for creating and storytelling. It feels just as fragmented now, only outside the home instead on in, because there are fun activities at school to be involved in and teenagers (and their friends) to feed. Speaking of which: about a month ago, I cooked a meal for the neighborhood friend group who were heading off to college, like a send-off of sorts. When the girls were little, something of this scope would've been called A Birthday Party. These days, it is simply Having Friends Over for Food And Hanging Out. Same concept; fancier nosh. 

Anyway, we're three weeks into the school year and I'm finally sitting down to process it all - endings and beginnings, and all the bits in between. I have so much to update, so forgive me if this is nonlinear and jump-about-y.

In March over spring break, Emily and I went to New York City. We both had agendas: hers was a bookstore crawl; mine was food and, really, just being in a city that holds so many good memories for me. We hit Magnolia and Junior's and Levain and some other less-touristy bakeries, plus matcha cafes and Koreatown. We watched Hadestown on Broadway - an especial treat for Emily who plays trombone. 

The Center for Fiction, Brooklyn, NY

Our hotel happened to be in the center of the garment district so we visited Mood Fabrics.


Here's a video tour of Mood:


There were so many other, less famous stores, too. And cheap, both objectively but also especially for a place like NYC. Also extremely specialized. Here's one that sold mainly zippers, with just a few other random notions. I got to ask for stuff here in Chinese like I did back in the day in Singapore. It felt like home. I wish MN had something like this. 


In the same month, I started my fourth grief support group. I keep thinking that each one I'd led would be my last, because each runs for three-ish months, and 13 evenings are a lot to pull out of a schedule already full of swim meets and concerts. Then I keep changing my mind; every day there are people losing people, and if I can sit with some of them in their pain and help them feel a little less lonely or insane (or both), I want to keep doing it. We cry a lot, but there is also raucous laughter, both of which are awesome.

In April, I made a short solo trip to Singapore to see Mum and attend a niece's (second cousin, actually) wedding. This was Jenna's senior year, so each week in the spring was filled with something exciting and poignant, and I feel lucky to have been able to squeeze this in.


Lovely Mum eating a matcha dessert

In June, we threw Jenna a grad party. 


It was lovely to celebrate her, and to be surrounded by friends and family. In addition to an entree, and we also baked a buffet of cookies,

Cookie buffet 2025

and I drew the traditional party poster, like I'd done for the kids' birthday parties in years past. 


Digression: Apparently, I forgot to post about Emily's grad party from two years ago. There was a lot going on then, too, so perhaps I decided to let it go. Let me share just a couple of pictures. 

Emily and friends
Photo credit: our wonderful neighbor Robel Bezabhe

Cookie buffet (the original!) at Emily's grad party, 2023.
Photo credit: Robel Bezabhe


Emily's watercolor cookie labels

This was Emily's grad poster, consistent with the quick cartoon-animation style of all those birthday posters. Like those, this was drawn with my smelly alcohol markers, minus a blender pen, which I didn't think to buy when I was mostly doing lettering and graphics but which turned out I sorely needed. for portraits. 


This year I thought I'd experiment with a more realistic style than the usual animation approach - mainly because my girls are alike enough that cartoon Grad Jenna would look almost identical to cartoon Grad Emily. This was my test-run. I used the same markers, and this time with not just a blender pen but also more shades of skin and hair. I used a video tutorial on YouTube and was pleasantly surprised by how it turned out. 


Here are those stinky markers. And I'm not kidding about the fumes - a person would need to use them in a really well-ventilated room in order not to get all heady and silly.


Some in-progress shots. I used one of Jenna's senior photos as inspiration.


This was the finished poster. 


In July, I ran my second Menagerie workshop at the Minneapolis Textile Center. 


I should've publicized it here, but I was so busy prepping for it that I forgot. I do, however, have another, drafting (!!) workshop coming up in the fall which I am remembering to share info on  - look out for it in a later post, along with a report on that July soft toy workshop.

Miraculously, in the middle of everyone's busy schedules, we found a weekend in August for a short vacation in Canada. It was absolutely gorgeous, and the weather was kind. 

Moraine Lake

Creek on our rental property, Canmore

The Rocky Mountains have such character! And the glaciers! 

The Saskatchewan Glacier, seen from Parker Ridge, Banff National Park


I am so grateful that we live close to beautiful places. After the crazy-long plane rides to and from Singapore, the fact that a 3-hour flight could bring us out of the country to Canada seemed unreal. 

Now that the kids are back at school/college, I'm working on Menagerie 2 again. It's going on 7 years, partly because those years spanned losing Aunt Laura and Dad, and all the detours my life took while hibernating and healing. Designing and sewing animals are still gloriously fun, and I do snatches of it when I can. I've just finished documenting the hedgehog and eagle, and I'm only three animals away from the finish line. The final animal is a mandrill, because the collection had been missing something simian, and mandrills are the colorful-est of them. More photos to come. 

I'm watching All Creatures Great And Small on PBS. I loved the books, and I've been missing hearing English-as-it-is-spoken-in-the-UK so I've been enjoying this and trying not to binge. Twenty years in the US and there are still times when I say a word and have to pause and think about whether that means what I think it means to Americans. Like "flat" (apartment vs punctured tire) or "pants" (trousers vs underwear). Or the other day when I was trying to name the front part of the car where the engine is and all my brain could come up with was "bonnet", and one of the girls had to remind me it was called a 'hood'. I think that after you've lived in a place long enough, the languages from Before and After swirl together at some point, and not always harmoniously.

I'd love to say I'm in the midst of ten books concurrently, but I've hardly had the time to read this year. Most recently, I finished If Cats Disappeared From The World, but only because it was very thin, and even then, it had to come with me on two separate trips involving longish plane rides. On my metaphorical bookstand now is Babel by RF Kuang, which Emily recommended, and which, if the title is any indication, is consistent with this language theme I have going on in my choice of entertainment. I've just finished Chapter One. That's good, right? I've progressed beyond the contents page, at least. 

As I write this, I'm missing Jenna, just as I missed Emily when she was a freshman and newly vanished from our house. Eventually, we became accustomed to her coming and going, so that it actually felt somewhat normal, so I'm reminding myself that we will similarly adjust in time with Jenna. She was home to celebrate a family birthday last weekend and for an afternoon, the kitchen was once more filled with the sounds and smells of her baking. I also got to help her with some Physics (hurrah) homework.  We both know that the stuff she's learning at college will very, very soon be way beyond what I can remember or be useful in, so we're enjoying this tentative arrangement while it lasts. 

Emily has a full school and work schedule. She runs the university book club, her creative business Lavender Chai Co - in both retail and wholesale capacities - and is an intern at a local publishing company through the fall.  Kate is in the thick of the swimming and marching band seasons at the high school. Everyone is in some kind of music ensemble so very soon the rounds of concerts will begin, and our evening outings will shift from pool decks to auditoriums and music halls. We will be busy, which will make the weeks seem to fly by. This alarms me a little but I know I can't slow time, only my engagement with it, so I am going to try my darnedest to feel everything, and say yes to as much of this as I can fit into each day. 

Mum turned 80 this summer. I am unspeakably grateful for her in my life, and specifically that she is only a phone call away, and as funny as ever to talk to about anything and everything. I'm learning to live with not knowing when we will next be together, but hoping, trusting and planning for it anyway. There are so many factors that contribute to the uncertainty, with almost all of them related to being in different countries apart which require a non-easy and exorbitant means to traverse. I miss Dad daily and seasonally - I know that those of you who've lost loved ones will know exactly what I mean - and there are so many occasions when he would be the most perfect person to ask about a particular thing, and that conviction lands just milliseconds ahead of the realization that it's no longer actually possible. In those instances, I will let the entirety of that tension sit with me - something I couldn't have done, say, three years ago - and feel both bereft and blessed. Each makes the other significant, and meaningful, and therefore I'm learning to hold both together. 

And this seems a good place to end today. I hope you have fun plans for fall. Maybe new sewing projects for yourself or little ones in your lives. Maybe exciting ideas for handmade Christmas gifts. Maybe travel. Maybe a life transition, or a difficult situation turning a corner at last. Maybe a way to hold on to peace amidst the insanity that has been in the news of late. And maybe simply some internal self-work that's found traction or seen fruit. If so, hurrah! Hug someone you love. Eat chocolate. Be well. Until next time -


Saturday, June 28, 2025

Bendy Flowers


I have an unplanned tutorial for you today!

Last fall, I made some toys for the children of a friend, and as is often the case, I ended up making something new without intending to. This is a bit of a mixed bag. On the one hand, it's fun to create something I've never made before. On the other, I'm slightly exasperated because it feels manic and extra, and a part of me is motivated to do calm things and be normal now that my own kids have long outgrown the toy phase. Does anyone else feel like this, too, or is it just me trying to figure out how to be a parent of almost-adults?

Anyway, so I made a box of dirt for my friend's children. Not like my original dirt toy, which was a standalone foam thing that we still own, stashed in some closet in the basement, but the easier pool noodle version. This was a mini version of that box of dirt - I had a large shoe box sitting around so I used that. 

Then I had to figure out how to make flowers for the dirt box, and I had a vague idea for the bendy stems, so I made four. Bendy stems, that is. The flower heads themselves eluded me, because I wanted them to look a certain way but my brain was not connecting the dots, so I procrastinated by making random carrots.


For a number of weeks, the box of dirt was packed with carrots and headless flower stems. It was stupidly tragic but I was preoccupied with swim meets and band concerts and other things, so I let them be.

Who knew how long later, I finally made the flowers. 


They're absolutely random, and I literally made them up as I went. I made the generic yellow flower first - I hesitate to call it a sunflower or black-eyed Susan because it's anatomically wrong - and you can tell it was the prototype because the petals are optimistically irregular. 


Then, when I had warmed up a little, I concocted the other three: a giant daisy, 


a rose 


and a poppy.


While I was making them, I decided I would take photos because I could see myself making them again (they're very quick to put together) and, given how unreliable my memory is, would probably appreciate a tutorial for myself if that ever happened. 

So . . . here follows a tutorial for bendy flowers (and carrots)!

First, 

CLICK HERE for a downloadable printable for some templates.

Here's a general materials list for the flowers:
  • Batting or thin foam
  • Glue that works on fabric
  • Some stuffing 
  • Fleece for flower heads
  • Felt for leaves, calyxes and flower centers
  • Green quilting-weight cotton for stems
  • Sewing thread in coordinating colors
  • Needle for hand-sewing,     and
  • Thick (12 gauge) Aluminum wire, like this.


    THE BENDY STEMS

These are essentially bendy wire wrapped with batting, encased in a tube of fabric. As an overview, here are the completed stems, followed by instructions:


1    Cut the length of wire needed. Use needle-nosed pliers to each end into a short loop so that it won't poke out through the batting and fabric later.  

2    Cut a piece of batting that's about 2" longer than the wire and about 4" wide. Lay the wire on the batting near one long edge and about 1" from the one short end. This will be the lower end of the stem.

3    Apply glue along the wire so that it will stick it the batting. Then begin tightly rolling the batting around the wire. When you get to the other long edge of the batting, apply glue to allow it to stick to the rest of the roll and not come undone. 

4    Cut a strip of green fabric that is 2" longer than the wire, and wide enough that it can wrap tightly around the batting-wrapped wire, plus seam allowance. 
Fold the fabric along its long midline with its RS together. You're going to sew a narrow tube with its bottom end closed. With the sewing machine, I would recommend sewing no more than 4" or 5" of the bottom section of the tube, turning it RS out and hand-stitching the rest. It gets really difficult to stuff the batting-wrapped wire into it otherwise, especially if it's very snugly-fitted.

5    With the sewn tube RS out, fold up the 1" of batting at the end of the wire and stuff that bottom end into the tube. Fold in the SA of the fabric and ladder-stitch the rest of the tube shut around the batting-wrapped wire. When you are about 2/3 up the tube, pause and insert a couple of felt leaves, then stitch them into the tube and continue stitching the tube up to its top end. 


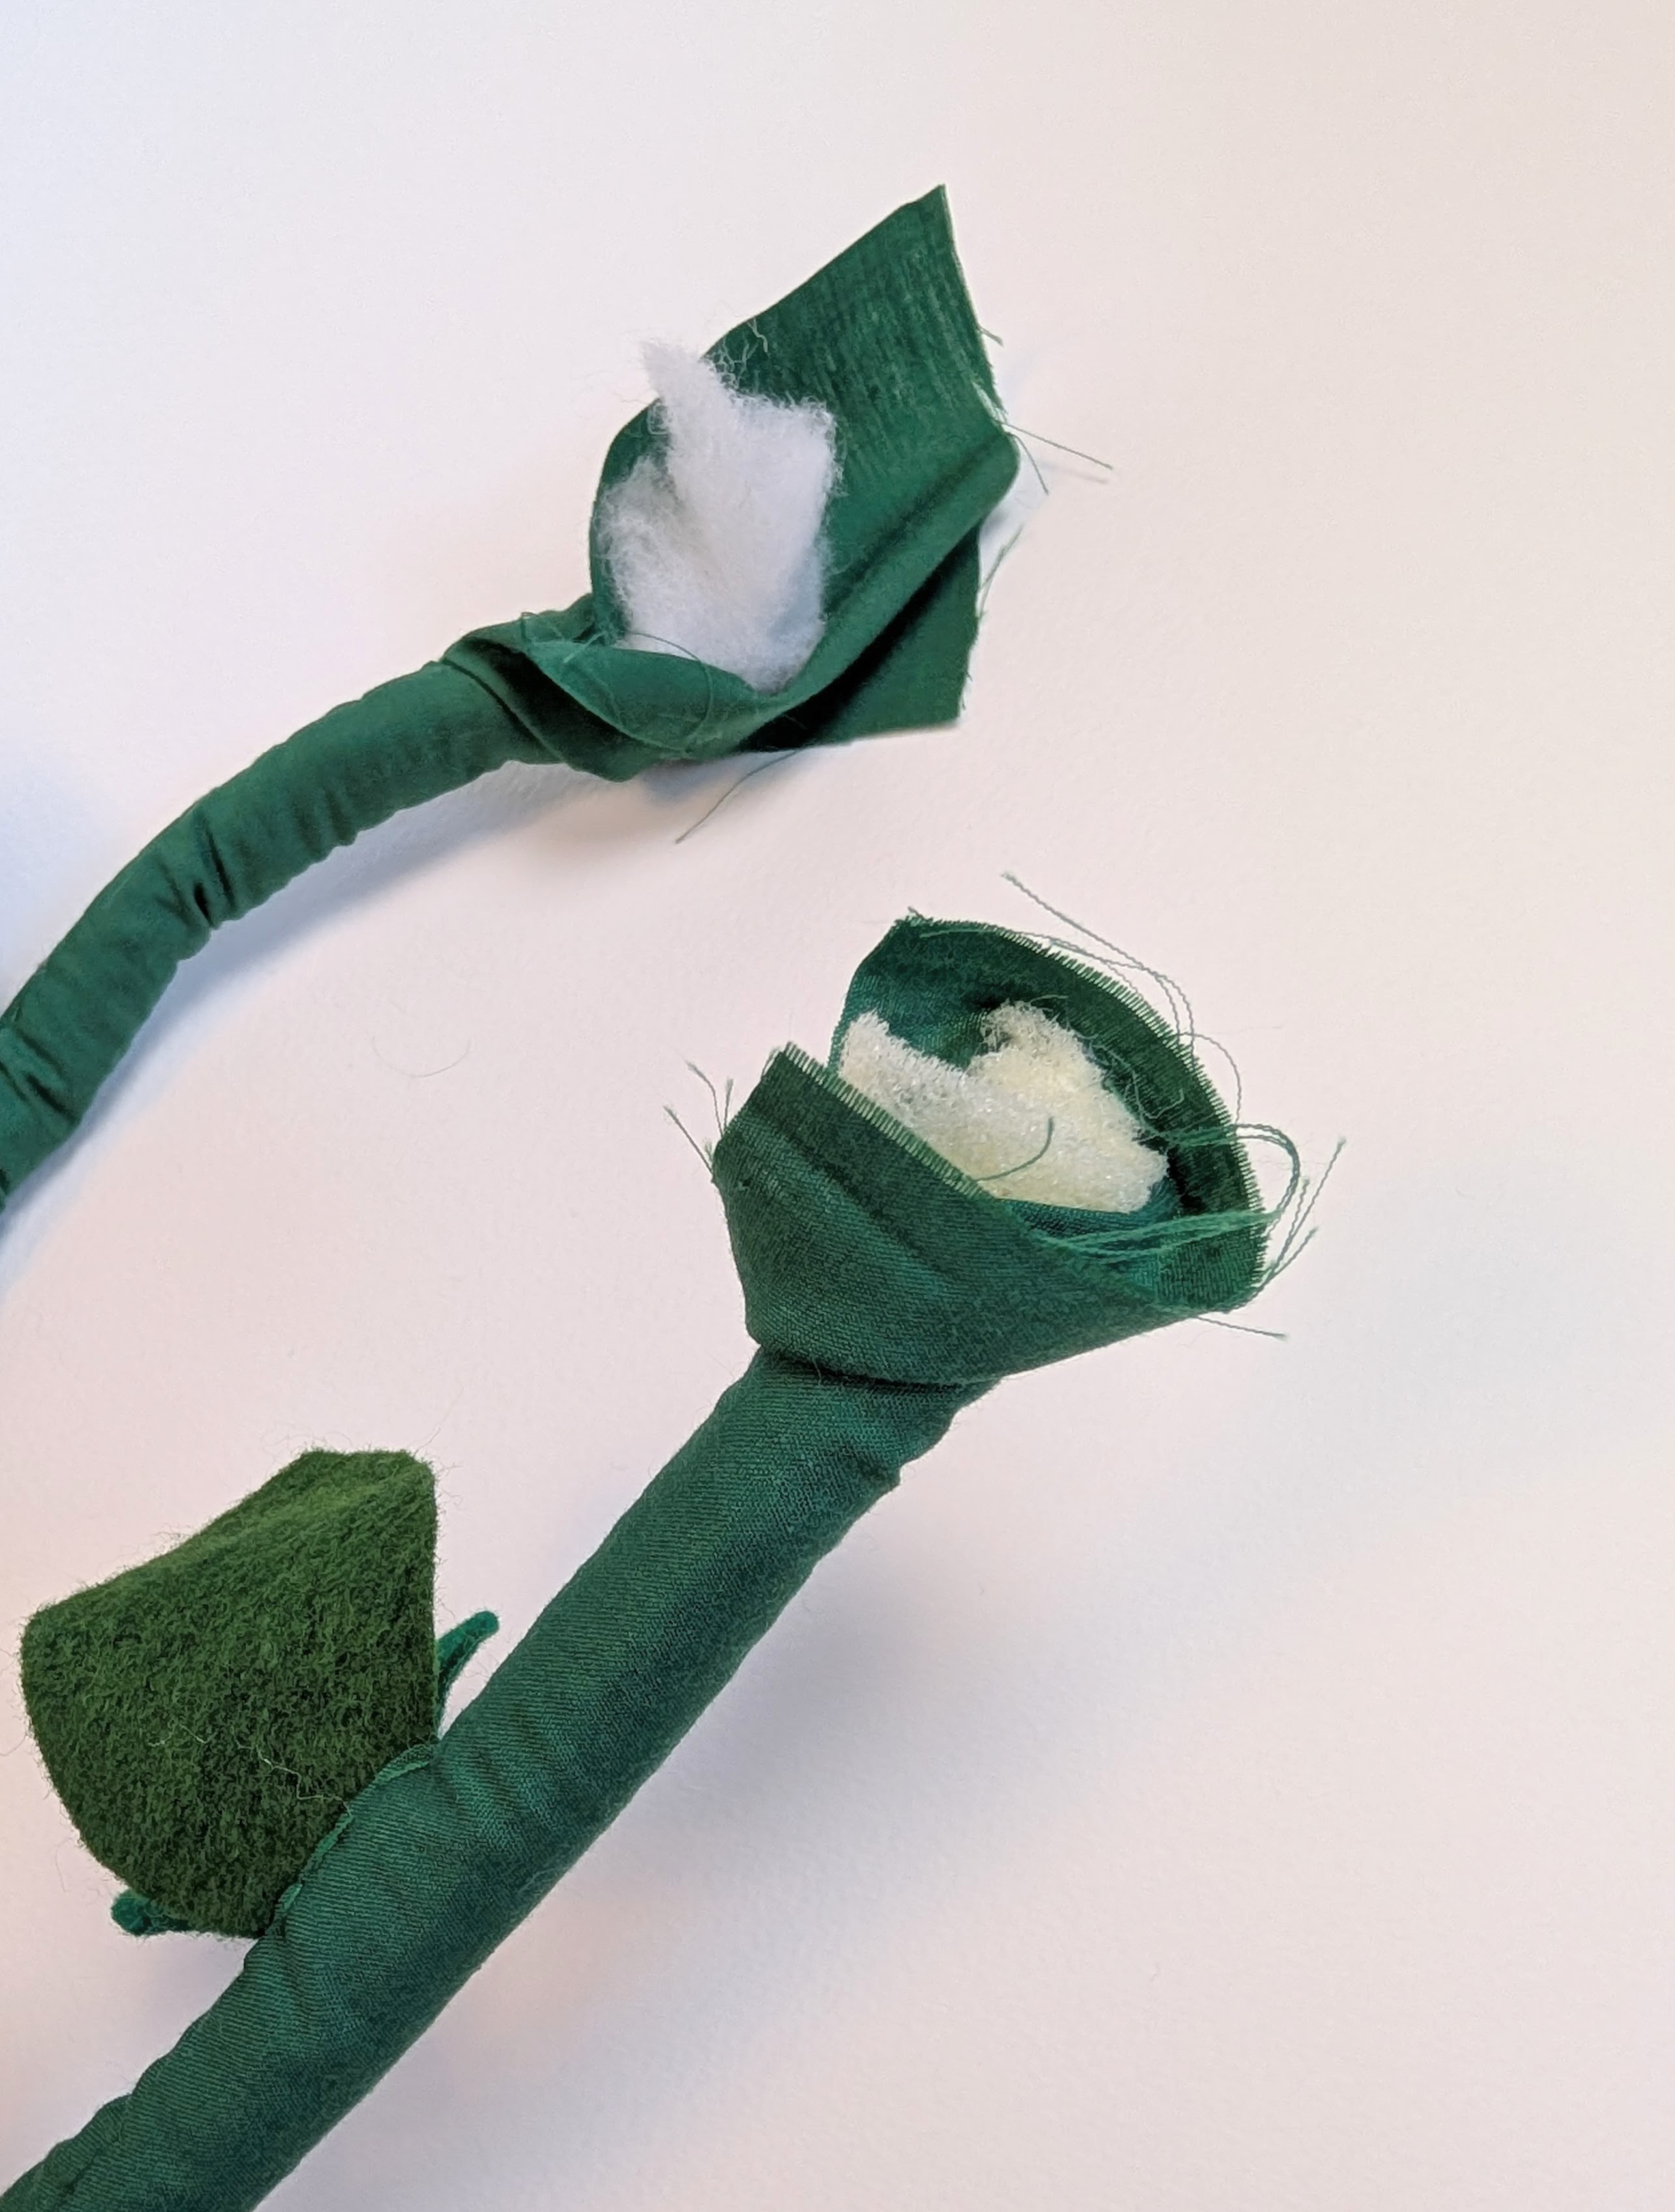
Here is a picture of the top ends of two stems - I left them partially-open to show you the next photo,


in which I'm using pliers to twist the end of the wire into a blunt loop 


so there are no sharp wire ends poking out. This photo shows the top end of the wire, but the same should be done to the bottom end of the wire as well.


Continue stitching up the rest of the tube. The stem is finished and ready for its flower head.


II     DAISY

You'll need three bits of fabric:

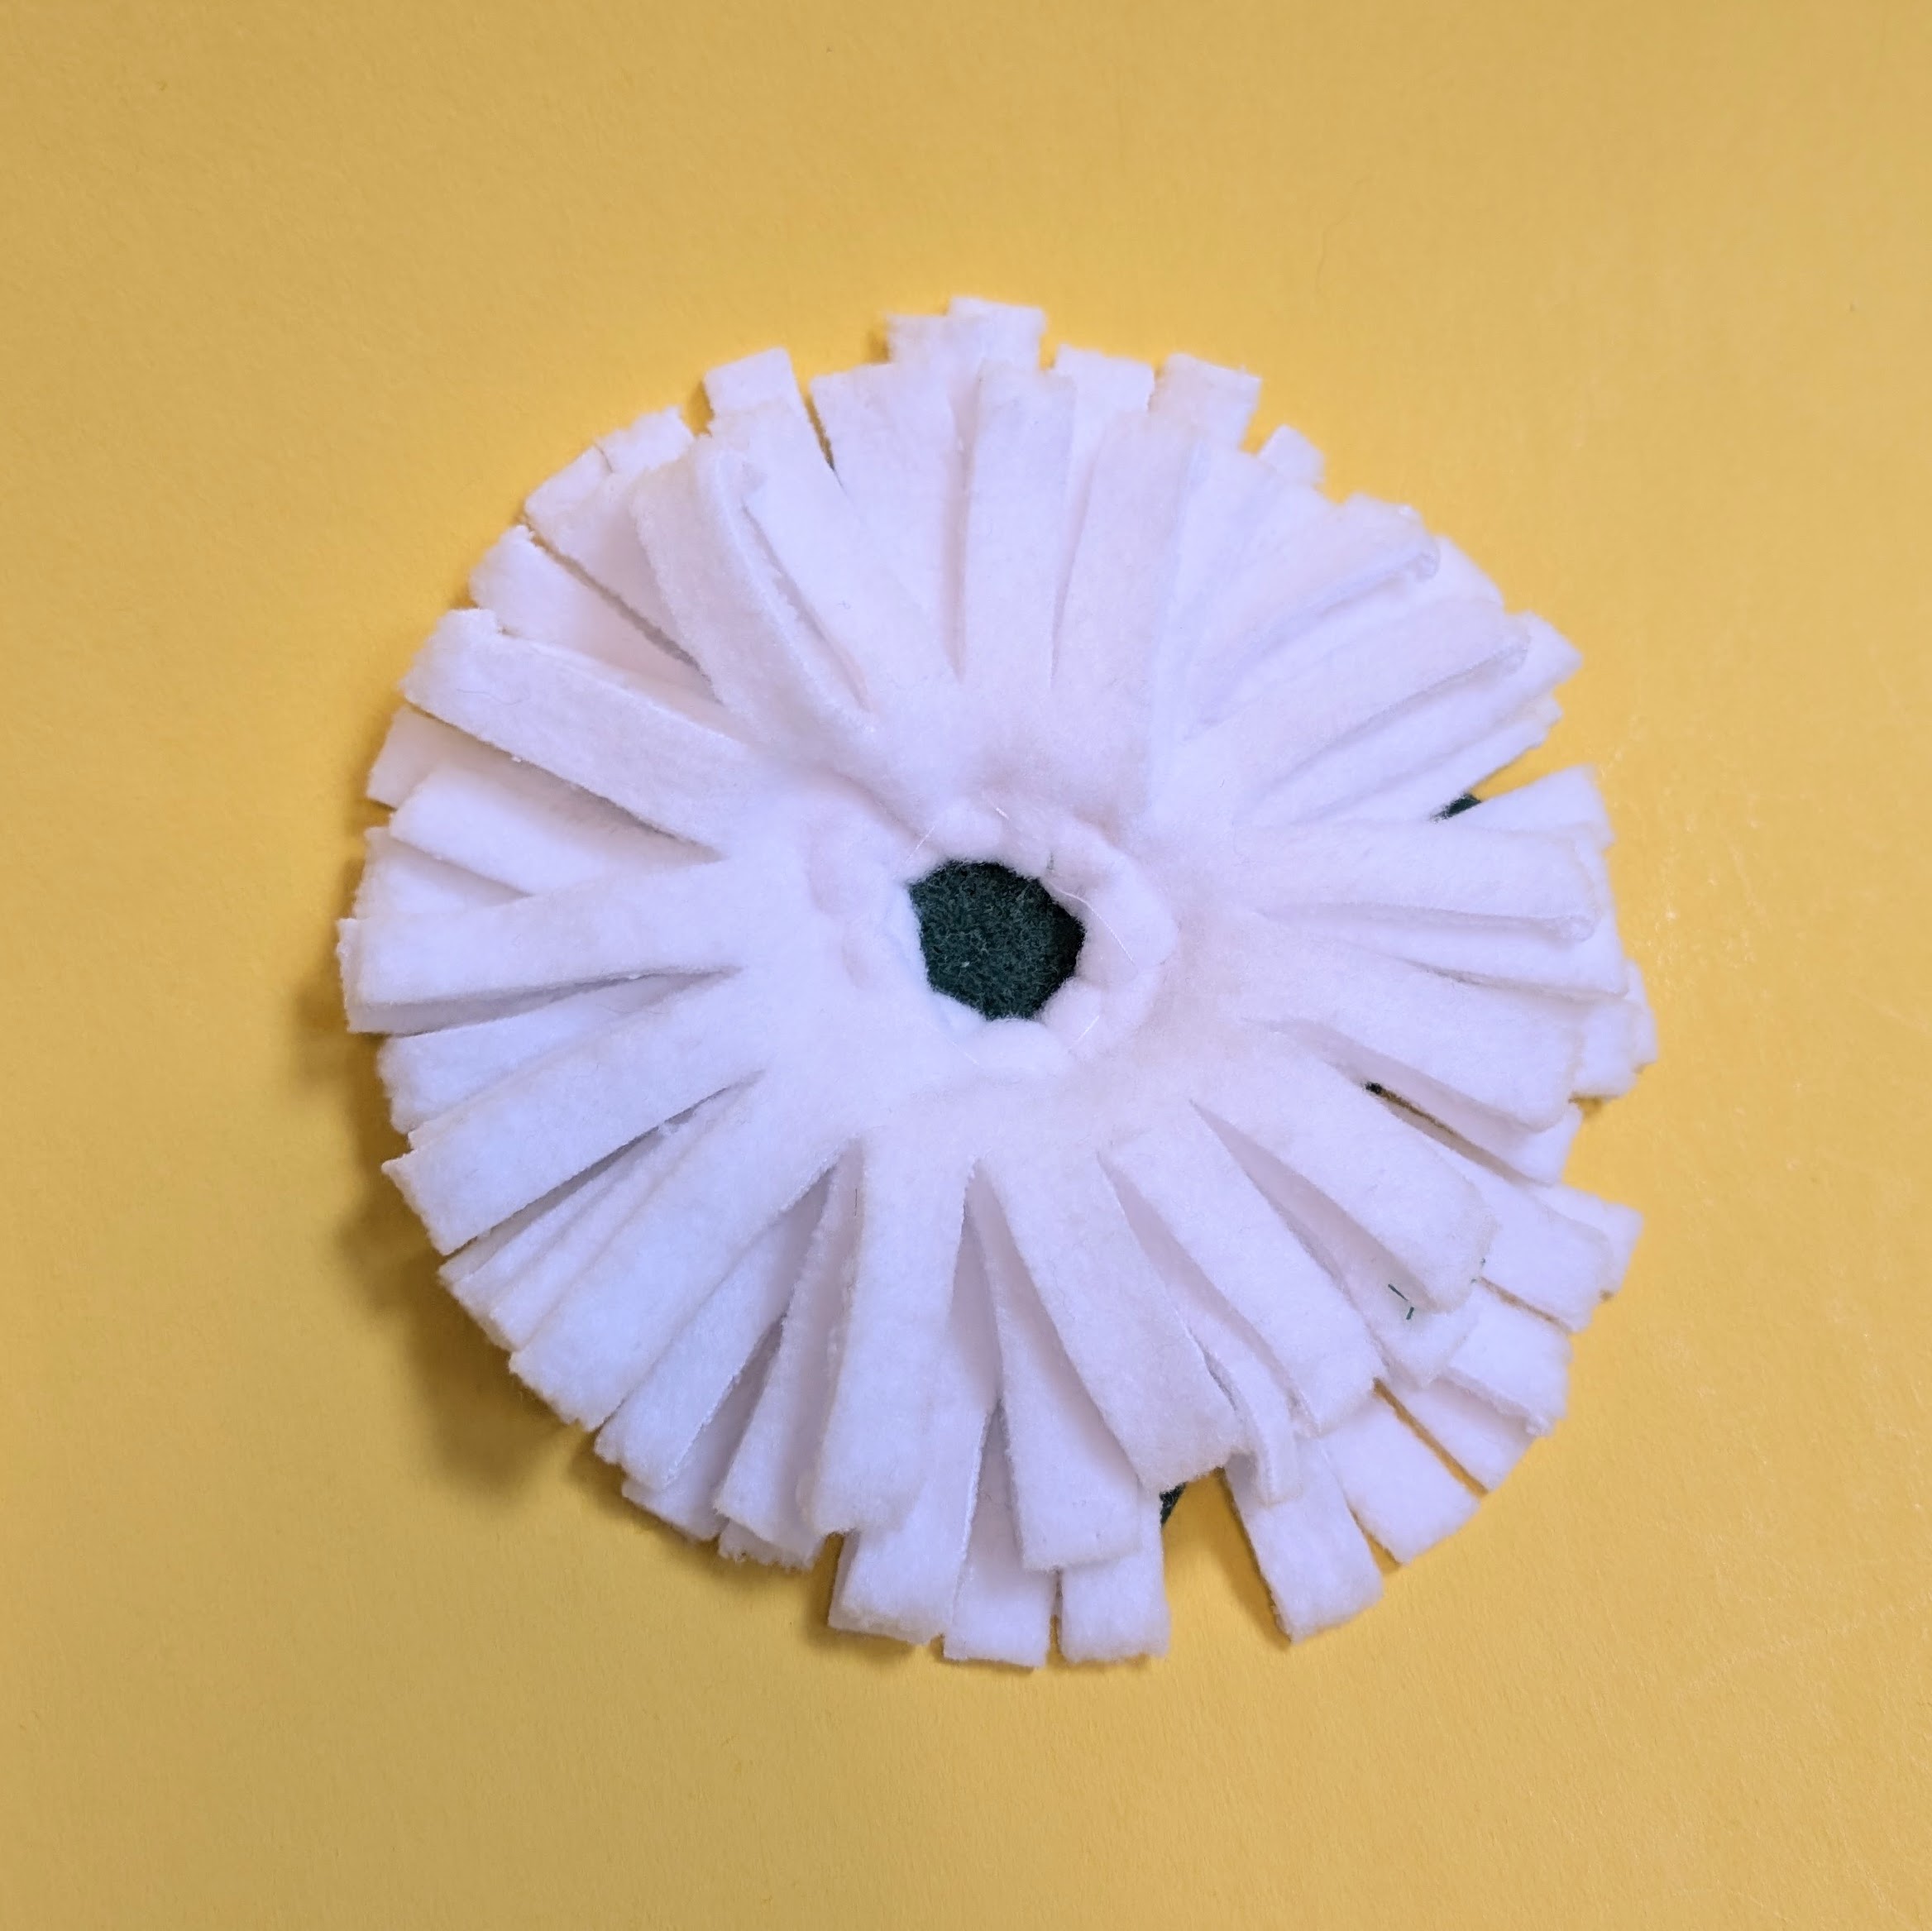
  • White fleece, about 18" x 4" folded into half lengthwise. Cut slits (about 3/8" or 1/4" wide) along the unfolded edge. This strip of white fringe will be the petals.


  • Green felt, about 4" x 4"


Sew the strip of white fringe onto the green felt square, beginning with the outside of the circle and working inward. The strip should be long enough to make two circles, with the inner circle slightly smaller than the first.  


This is the view of the underside of the green square. 


  • yellow fleece or felt, about 10" x 1". Fold this along its long midline and baste  their long sides together. Cut slits a little wider than 1/8" along the folded edge.


Stitch the yellow center by hand. Begin on the outside and spiral inward.


The last bit (i.e. the very center) can be fiddly. Rather than continuing to hand stitch to the very end of the yellow strip, stop with about 1" left, and tie and cut off the thread. Start with a new knot, this time from the free end of that last 1" of the yellow strip. Poke the needle down into the very center of the flower, through the green felt visible through the hole. Pull the thread down to tug the end of the yellow strip into the center hollow. 


Now work backward toward the point where you'd tied off the thread earlier, stitching down that last curled section of the yellow fabric.


Trim off the ends of the white petals if any are of irregular length.


The daisy head is completed.

To attach the bendy stem, first make a calyx. Cut two pieces of green felt, each about 4" x 2.5".


Place the top end of a bendy stem on one felt rectangle so that about 1" of the open end of the stem extends beyond the top edge of the felt rectangle. 


Place the second rectangle on top of the first, align all sides and sew through all layers as shown. You'll catch the stem in the seam in the process. 


When you peel those two rectangles apart, they'll form a rough square. The RS of the calyx is shown.  


Trim the square into a star shape.


Place the messy side (WS) of the calyx on the green square of of the daisy head. The top of the bendy stem will be sandwiched between the two layers of green felt. Bend the top of the stem 90 degrees to the side so it lies flat against and centered in the green square. Hand stitch it to the green square. Apply glue to the wrong side of the star- shaped calyx layermand stick it to the green square. 


Trim the green square to match the star-shaped calyx layer.


You can see in the side view that the final calyx is double layered.


This is the completed daisy.


III     BLACK-EYED SUSAN

Decide how many petals you want, double that number, and cut out as many of these yellow petal shapes. Pair them, with RS together, and sew around the curved sides and tops of each pair, leaving the short sides open. 


Turn each pair RS out - these are the petals.


Lay the petals in a ring, with the straight edge of each petal slightly overlapping the next and only a small circular space in the center. Stitch them together as a ring of petals. Use the instructions for the yellow daisy center to make the brown center of the black-eyed susan. Attach a calyx as you would the daisy as well.


IV     ROSE

You'll need a strip of fleece about 20" long, with tapered sides so that one end is 3.5" wide and the other is 2" wide. Fold this along its long midline, with RS together. Sew curves at either end as shown in the photograph.


Trim the SA of the curved ends, turn RS out, and baste the long sides together. You'll have a double-layered strip with one end slightly wider than the other.


Lay 1" of the top end of a bendy stem on the wider end of the strip and hand-stitch the stem to the fleece.


Start rolling. 


As you roll, hand-stitch the basted edge of the fabric around itself and to the stem.


Don't make the roll too tight, so that it's a vertical cylinder, but flare out the folded edge of the fleece like a real rose bud.


Complete the roll. 


This is what the bottom of the rose head looks like.


Cut a piece of green felt into the shape of a calyx. Make a small hole in the center and insert the lower end of the stem through it. Slide it upward to the bottom of the rose head. Apply glue and stick the calyx to the base of the rose head.


V     POPPY

You'll need 

  • Red fleece: Cut 3 to 4 irregular circles, in increasing diameters of about 3" to 5".
  • Black fleece: A 2" circle and a strip 6" x 2". In the photo below, the strip is shown folded along its long midline and cut into a fringe along its folded edge.


Begin with the black felt circle. Sew running stitch close to the edge, then pull the thread to gather the circle into a ball. 


Lightly stuff the ball. Insert the top end of a bendy stem into the opening, gather the opening tightly around the stem, and hand-stitch the opening of the ball shut around the stem.


If you haven't yet done so, fold the 6" x 2" black fleece strip along its long midline, baste the long sides together and cut slits 1/8" apart along the folded side. Begin at one end of the frilled strip and hand-stitch it around the base of the ball, wrapping it around underlying layers.


Continue stitching to attach the entire length of the frilled strip to the ball.


Cut a cross-shaped opening in the center of the smallest red circle


and slide the stem through it.


Stitch the edges of the opening to the stem. Try to shape the red fabric so that it sits as a shallow wavy funnel rather than a flat circle. This will help it stay distinct from the adjacent layers of petals.


Continue adding the remaining red circles in increasing order of size. To make it more realistic-looking, I've gathered the fabric of some layers together, or folded the fabric over itself, to introduce waves. I've also trimmed the edges of the petals to make the wavy edges more pronounced.


The calyx is made in the same way as the rose's, except shaped differently.


VI    CARROT

You'll need
  • Orange flannel or cotton, cut according to the template.
  • Green felt, 4.5" x 3"

With RS together, sew the carrot as a narrow cone with its top edge open. Turn RS out and stuff. Hand-sew running-stitch around the opening and pull the thread to gather the opening loosely shut. Set aside briefly while you prepare the green topper.

Cut slits 1/2" apart and about 2.5" long, parallel to the 3" side of the green felt rectangle. This means you are cutting into one of the 4.5" sides. Now roll the rectangle so that you get a tight roll 3" long. One end of the roll will have strips of fabric splayed open; the other end will be an uncut 1" portion. Insert part of this uncut portion into the opening of the carrot and continue gathering the stitches tightly around the green felt. Knot to secure the opening shut around the green felt and stitch through the felt to secure the carrot topper inside the opening.


Here's a bunch of completed carrots sitting in the dirt. One of the carrots in the picture looks different than the rest because it was an early prototype, It was an easy decision to discard it as it was both fiddlier to make, and not as cute.