Today's post will be even more boring than usual. It's all darts, darts, darts - dart rotation here, dart opening there, waist darts this, back darts that. Er... sorry if you're visiting from Pinterest or somewhere, looking for fun cardboard crafts or toys for children. Welcome! We're converting my regular french dart foundation block into a princess seam block, see, and that's why it looks like drafting hell around here. The whole task actually took less than an hour. This is to assure you that it's actually a very fast process, okay? The adjusting of the resulting muslin (and the copious amount of photo-taking), of course, is another story. However, if the draft is a half-decent one, it shouldn't require more than one more fitting or two.
So, let's start with the normal darted block. I traced mine onto kraft paper to make a copy to mess about with. Here's the front block. I've left a lot of random allowance around the area of the darts, in case I needed to reshape the side seams and armscye later.
Now, this block has three darts - one waist dart, one french dart (under the bust, opening into side seam) and one armscye dart (opening into armscye).
Q Why do people use so many darts in a sloper?
A To get a good armscye fit, which translates to a good sleeve fit without gaping or pulling. Some people need more darts to achieve this. The final garments that are made from these slopers will not necessarily have this many darts because these darts can be merged and shifted and integrated in other ways into the seam design.
Case in point: princess seams need two darts, so I will merge the french dart into the armscye dart using a process called dart rotation. I mentioned it in overview in this earlier post. Here is a diagram of an overview of princess seams:
Essentially, there are two parts to a princess seam. The lower part is the waist dart. The upper part can be positioned anywhere in the upper chest area - I drew three common positions in the diagram. I'm picking the armscye dart position.
First, I extend the point of armscye dart to the actual bust apex point.
Then I decide where I want the center of the final armscye dart to be (blue line on paper).
Then I cut open the armscye dart
and tape closed (forever) the french dart. That's the end of it. Au revoir, french dart!
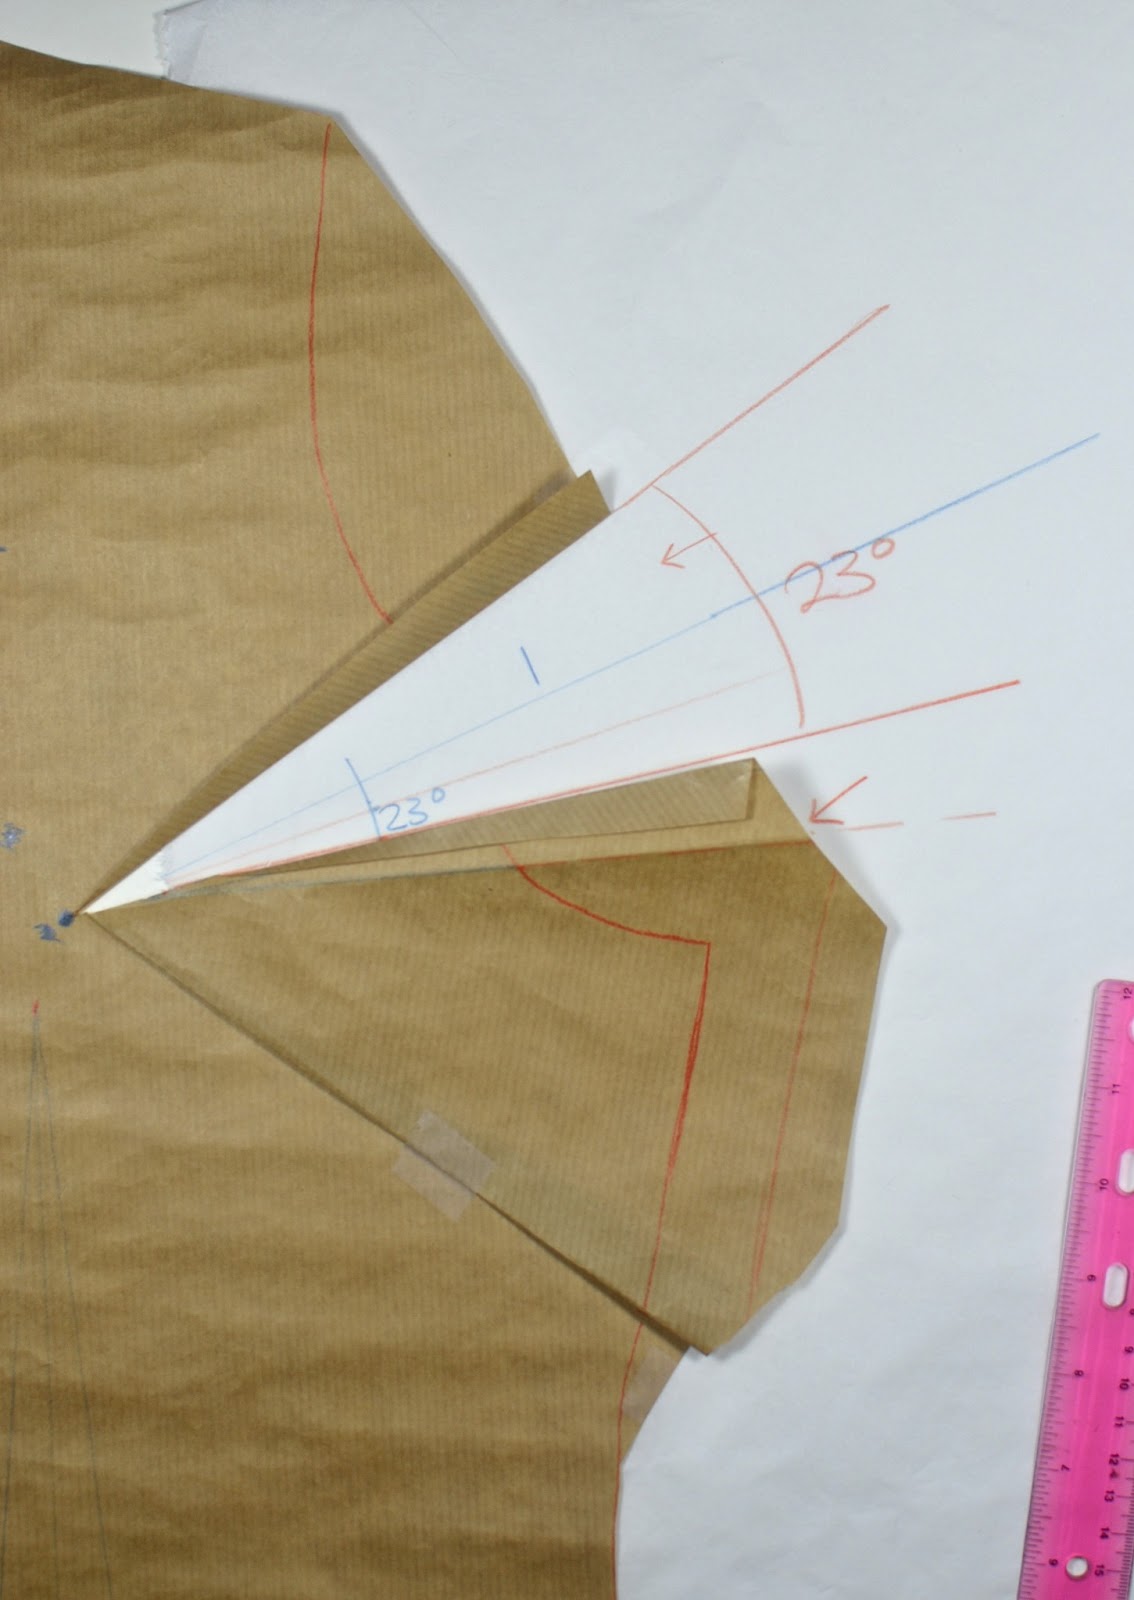
The armscye dart has now enlarged by the amount shown by the white gap that's opened up in the brown paper. And the new, final, total armscye dart is the part between the two red arrows. Isn't it huge? This is why we either turn such a big dart into a princess seam OR split it into two darts, like we had before merging them. Remember - more numerous smaller darts are neater than a single huge dart.
At this stage, the princess seam darts are ready to be turned into a princess seam and we can stop here, slice the paper apart and start making our muslin. But I want to digress a bit and show you a behind-the-scenes account of how subjective drafting is with me. I suspect quite a few of you will pass out at this point so go ahead and skip the next three photos but I'm just including it all for completeness.
So let's say that I look at the position of that new, final armscye dart and feel like something isn't quite right. I think, "Actually, I think it's angled too low and will make a very horizontal-looking princess seam. I think I want it to be tilted upwards a bit more, so it sits within the hollowest part of my armscye region instead of disappearing into my armpit." So let's move it again. I fold away the brown paper to expose the full dart, take my protractor, measure that dart angle (blue 23 deg)
and tilt that entire dart (red 23 deg) towards the shoulder.
I fold and unfold the relevant brown paper edges to get that final dart. Yes, it looks nicer now (and I do think of my drafts in terms of "looks nice" or "looks wrong" - kinda like how I look at a word whose spelling I'm not sure of and if it looks right, it's right).
Okay, I promise I'm done now with the nebulous subjective nonsense. Let's get back with the program and smooth the seam edges now. We do this by temporarily taping shut that new ginormous armscye dart
so we can reshape the armscye into a smooth curve.
Cut along the outline of the block, discard all that extra border around the armscye and open up the armscye dart again. Then cut apart the darts along their legs (i.e. their edges) continuously into the princess seam. The skinny diamond-shaped waist dart piece gets thrown away. The entire front block (originally labeled "Front") is now in two pieces: Front Center and Front Side, each with one side of the armscye dart and the waist dart integrated into its edges. Those two pieces, when sewn together along the edges of the continuous dart, will produce the princess seam.

Easy, right? There are a few other considerations before we declare this finished. They are too nitty-gritty to explain so I will spare you the extra information. Briefly, whenever you play with the darts and change something, it affects other parts of the draft. For instance, randomly deepening an armscye dart could make the final armscye itself smaller, so that your sleeve gets tighter. Or sometimes the shoulder slope is changed or the waistline gets tilted and has to be readjusted to compensate. Let's just skip over all that and pretend that I did all the compensations and we can all happily move on to the back block.
Here's a typical back block - it just has a vertical waist dart. Making a princess seam is often as simple as drawing in the upper part of that seam in the position you want (e.g. the armscye) and cutting the block apart into those two pieces just as we did to the front in that last photo.
Let's make a(nother) digression here. I've heard that there are some fancy names given to adjustments people make to their patterns to accommodate for certain body features (examples = FBA, sway back, etc.). I have totally no idea as to what these names mean, but they sound very formulaic and I see them on sewing forums everywhere, so they must be common knowledge and very important. I've also heard people saying that because their backs are rounded (as opposed to flat as a washboard, which would apply to 0% of the human population, really), they have to make (insert fancy adjustment name that I know not) to ensure a good back fit.
Can I show you a diagram of my interpretation of this "good back fit" adjustment thing that has all those fancy names? But before that, can I first bring out an old sketch from the archives? Here it is - the one showing front bodice dart positions.
 The back can be analyzed the same way. If you imagine that your back is a flattish mound, like a single, broad, flat breast, it's reasonable to say you might need some darts to shape this mound-y back. Just like you do with the bust area of the front block. But these back darts would be much, much shorter than bust darts because your back is mostly flat, except around the edges (i.e. shoulder, armscye, neck, side seams). Here are some common kinds of back darts:
Because they are so short and small, these back darts are very often incorporated into the back seam design of a garment so you may never see them the way you may see the darts in the front bodice.
For instance, when I made my french dart sloper here, I'd made a dart (red arrow) in the center back seam to make the back of my neck fit more snugly.
Then I incorporated that dart into the zipper seam, so that the zipper slants ever so gradually towards my neck. The result is the unwanted ease in the back neck area being removed in the shape of a dart BUT there isn't really a visible dart because the zipper sides absorbed it, see?

This is all well and good if your garment has a center back seam. However, if you wanted to cut your back piece on the center back fold (i.e. it has to be a perfectly straight line), you'd need either a visible neck dart (ugly) or to live with that unwanted back neck ease (also ugly, but different ugly). Fortunately, we can shift back darts just like with the front darts. Case in point: when I drafted this princess seam sloper, I wanted a perfectly straight center back line so I had to use a different dart placement to get rid of the unwanted back neck ease. I used an armscye dart instead.
In the photo above, that center back dart gets rotated shut. In other words, I move the yellow line YX back to the vertical so that point X meets point Z. I cut open the beginning of the princess seam (blue dashed line)
which then opens up into an armscye dart. I cut apart the back block along the princess seam
and that new armscye dart (which came from the closed center back neck dart) gets incorporated into the princess seam.
Here are the back block pieces in fabric. You can see that armscye dart more clearly here.
This is the front princess seam hand-basted in preparation for machine stitching. Do you see that the SA of the convex edge (the Front Side piece) is wavy while the SA of the concave edge (the Front Center piece ) isn't?

This was done by a process called "easing" and it will ensure that the final seamline is perfectly smooth, with no gathers or puckers. Remember that the actual seamline was made by cutting apart the paper block pieces along that princess line, meaning that the stitching line itself is identical in length on both sides of the princess seam, even if one edge is concave and the other is convex. It's the SA that don't match- the concave SA is shorter than the convex SA. Measure and see for yourself if you don't believe me. The trick to getting a smooth, pucker-free princess seam is to baste and sew exactly on the stitching line itself (which is guaranteed to align on both pieces) and not on the SAs (which will never match). And "easing" is the process of manipulating the (unimportant) SA in whatever way I need for the (important) stitching lines to stay aligned as I baste.
I know I'm in the near-extinct minority in advocating this but please, please give easing and hand-basting a shot, friends. It's not old-fashioned, okay? And it's not slow. I use it for setting in sleeves and curved seams all the time and it gives better and more perfect results the first time around with NO puckers. And because I soooooooo believe in its goodness as a sewing technique that I made you a movie of me hand-basting that princess seam!
Note that
- I only pin two reference points along the seam to ensure they stay aligned: the bust apex and the waist points.
- I do not baste the SA together; I baste on the stitching line itself. You can see my thumb doing the easing thing around 2:14 -2:29.
- I do not notch the SA of the concave piece in order to "match" the SA of the convex piece. This weakens the SA and the seam in general and makes it impossible to make any last-minute adjustments to that princess seam, if I should need to.
Click here or on the picture to watch my directorial and starring debut on youtube in all its grainy, off-focus and silent-picture glory.
Alriiiiiiiight! We're done! Was that too much information? Drafting is crazy that way - it's actually very straightforward if you understand the concepts. But if you don't (or if no one ever explained them to you) and you just follow the step-by-steps as if it were a tutorial, it's easy to get stuck in any number of places.
Now let's see what the muslin looks like. First, I thought I'd amuse you with some of the awful photos I took of myself in the mirror,
before giving up and waiting till the other adult in the house got home from the office to do a real photoshoot.
I hear you asking: "Why are you beheaded in every picture?"
Are you kidding me? I don't want to be plastered in an identifiable way all over the internet wearing some bizarre striped yellow second skin that isn't even a real dress. Nobody looks good in a sloper - we all look awkward and funny. I promise - when I sew actual garments from these foundation blocks, I'll smile for the camera!
And with that, I have officially escaped the Ugly TShirt Walk of Shame with plenty of time to spare, seeing as summer is absolutely nowhere in sight (we got snow this morning- did you?). I thought I'd stop here and head out to buy my ten chocolate bars but then decided I have one more sloper to make.
So far we have
- The french dart sloper (this post)
- The princess seam sloper (this post)
- The raglan sleeve sloper (this post)
but we must have one for all the garments that don't need darts - the knits, the Tshirts, the wrapped-bust bodices and the bias-cut patterns. I'll work on that tonight!