Saturday, January 10, 2015

Subtleties of Drafting: Darts Part III - Drafting Darts


Finally - we return to drafting. 

This third installment was very hard to write. Not because the material was difficult - on the contrary, it was actually the most interesting so far to dissect - but because there was so much of it, in so many layers, all of which I felt I simply must include, and organizing and summarizing everything was quite the challenge. And part of the organizing involved splitting it into two separate posts, so that this drafting trilogy has now become a four-parter. This third post is the most technical of all the four and there will be a lot to digest, so, people, get ready!

In the earlier two installments here and here, we discussed what darts look like, why people use darts, where they could appear, and how big to make them in order to get the effect we want. All that was more Math and Science than Art: we created darts according to the contours we were trying to shape, and those contours dictated how long, wide and deep to make those darts, and where to locate them on a garment. All very objective. And thus far, there hasn't been a lot of choice or artistic license, let alone any drafting subtleties to speak of. 

When people draft patterns (or slopers), they are drafting for either of two kinds of bodies:
  1. arbitrary industry models OR
  2. actual real individuals. 

Arbitrary industry models are approximations to real human bodies. They take into consideration a variety of body types and ratios of vital statistics, but not actual individual flesh contours. They cannot, because there is simply too much variation in real life. However, this also means that people who draft for industry models can do so from measurement charts and grade their patterns into different sizes without actually looking at or measuring an individual body standing in front of them in their underwear. They shape the best generic template they can, call it a sewing pattern, throw in lots of design ease to increase the chances of it fitting more bodies en masse, and leave it to the home seamstress to adjust that template to fit their own, real contours. 

Today, we will be drafting darts to fit single, real bodies, with real contours that bulge and sag and defy supposedly-standard bust-waist-hip ratios. This means that we will not be following pattern conventions, design features, size charts, grading rules or standard adjustments. It simply means that we will look at a body we want to make a garment for, and draft darts to fit that body. In the process, we will have somewhat unsystematic conversations about drafting darts. Forgive me if they come out of nowhere and meander about in broad, vague ways, but the conversations worth having are often like that, aren't they? 

 Here are two points to help focus our discussion:

1 Show me how to draft darts! 
That was exactly what I wailed at my mother and aunt years ago when I didn't know anything about drafting. Translated, my ignorance sounded like this: 
  • Where do we put darts - where on the garment, and how are they oriented? Are there rules, is it a design choice or, worse, is it a free-for-all?
  • How big (long, deep) do we make them? Is this always the same for all bodies? For each body? For each garment on each body? Is there a formula? 
  • Will they always be right? How do we know they are right? What does it look like if they're wrong? 

Let's first talk about body shapes and muscle tone and youth and (for many of us) the lack thereof.

One of the first things about shaping that became clear to me over the years as I drafted was that darts and seams worked together in tandem, in some mysterious balance for which there were no fixed rules. I also realized, by observing other people's garment efforts, that there were no rights or wrongs in fit, only preferences and design choices. Even now, when I behold a dress on someone, and I scrunch up my eyes and frown at the way it fits (or doesn't), I am really thinking, "I wouldn't have drafted it that way." Or "I'd have used straighter side seams and deeper waist darts instead of those shallow darts and pinched waists that she's now wearing." And while I may think the fit is "poor" or "bad", I hardly ever think of it as "wrong". After all, it's still a wearable garment with holes to accommodate the wearer's arms and head, and it isn't tearing at the seams, and there are features like zippers and button plackets to allow the wearer to get in and out of it when needed. Instead, when I decide that the fit of a particular garment on a particular body is subpar, I really am only making a judgement on the choices the designer/seamstress made when constructing it. In other words, what I might think of as "too loose" or "too tight" may be something the wearer/designer/seamstress finds perfectly flattering and alluring. 

In the same vein, every time I draft a sloper or garment pattern, I am making a subjective judgement on the relative degree to which I shape by seams vs. darts. Here, let me show you what I mean. In the diagrams below, the green lines are the seams (in this case, the side seams) and the blue lines are the darts (in this case, the waist darts). When I look at the contours of a body I am drafting for, I think of ratios and degrees. I ask myself, "How curvy should I make those side seams? How deep should those darts be? Which one should I use more for shaping the (let's say) waist - more darting or more seaming?"

We've talked about that before on ikatbag - in this earlier post on shaping skirts to fit. However, that was just the waist-and-hip region - today, we're focusing on the waist-and-bust: same concept, only in a more dramatic part of the anatomy.  

Let's do some drafting together to illustrate that on paper. 


Drafting for a woman's upper body follows the same sequence as that for a child - plot the neckline, shoulder point and slope, then mark the bust/chest and waist reference lines. Then plot the darts. 

The first dart we plot is the vertical waist dart. The bust dart comes later.

Here is that old diagram again from Part II, showing our visual explanation for the origin of the waist darts. It is actually more accurate to say that the difference between the red and blue measurements is the waist shaping or the waist ease that we need to deal with. 


Now let's look at how we precisely calculate and deal with that waist shaping by actually plotting the darts on a draft. Note that in the diagram below, we're measuring only the front of the body; because the front contours are very different from the back contours, we NEVER measure around the whole body and divide that measurement by two as we casually did in the illustration above, as if the front and back were equal halves.

The front bust measurement B (red) and front waist measurement b (blue) are themselves halved for the one-sided body plot, and these measurements reflected in the length of the red and blue lines. 

At this point, we can make one of three choices:

Choice 1: Shape Only By Side Seams
We assign all the waist shaping responsibility to the side seams. There are no waist darts. We simply connect the end of the bust line to the end of the waist line into a very nipped-in side seam. 

Q: When would we choose this? 
A: For bodies in which the chest-waist difference is quite small, or for whom the chest-waist difference is mostly concentrated in the sides, not front, of the body. For example, children, men and slender female adults with relatively flat chests or wide waists, or both.


Choice 2: Shape Only By Waist Darts
We could also swing to the other extreme and shape by darts only. To do this, we extend the blue waist line so it is the same length as the red bustline. That extra extension is the width of the waist dart.

Now, we draw the side seam from bust to waist and - if we like, extend it further towards the hip and complete the two-pointed waist dart. From the bust to waist, the side seam is perfectly vertical; all the waist shaping is done only by the waist dart. 

Q: When would we choose this? 
A: For particularly well-endowed women who also have wide waists, also post-natal figures, with their doughy midriffs fresh from a recent birth. From the front, these figures will not look particularly hour-glass-y, but from the side, there is a pronounced difference between their bust and their waist contours. Therefore, the sides of their waists need very little shaping but their underbust areas, which are very hollow, would benefit from a deep waist dart.


Choice 3: Shape By Both Side Seams and Waist Darts 
Most people's bodies and garments fall in this category. The judgement call in this situation is not just the choice of partial dart-seam shaping over exclusively one or the other but also the degree to which the shaping is done with darts vs. seams. 

To draft this, we pick a dart width that is less than the full difference between bust- and waist- measurements. How much "less than" is the judgement call I mentioned earlier, and it is one of the many subtleties of dart drafting.

Then we extend the waistline by the width of this waist dart. Then we connect the ends of the bustline and waistline. We now have a less-angled side seam than in Choice 1 and a smaller waist dart than in Choice 2. The waist shaping has been shared by the side seam and the waist dart. 


Q: When do we choose this? 
A: Most garments, for most people. However, the degree to which we swing towards either more dart, less seam or less dart, more seam depends on many factors including (as we mentioned) age, body type, body shape, muscle tone, distribution of body fat in the midsection, and even the kind of garment on the same wearer. For instance, a more tailored garment (e.g. a fitted blazer, a wedding gown, a corset, a qipao) might have a different dart-seam combination than a garment that hangs more loosely about the body (e.g. a shift dress, a button-down shirt, a Tshirt).

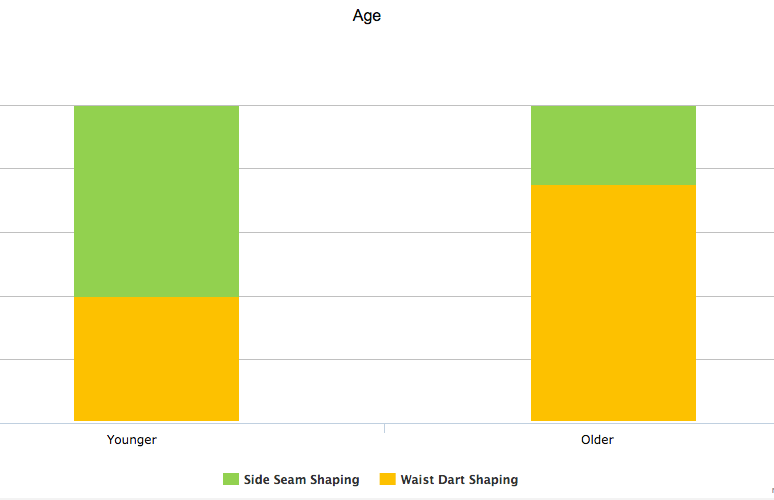
Here are some very arbitrary bar charts to illustrate that degree to which we might choose to shape the waist by seam vs. dart. I picked three random categories - age, natural contours and type of garment. A different seamstress or designer might have have preferences that result in completely different-looking bar charts. As I'd said, while there is logic behind the preference, it's still subjective.


Q: How do we know we've picked the right ratio of dart vs. seam shaping?
A: When the resulting garment sits well on the body, without pulling of the fabric in weird directions. Often, we'll only know this after making a muslin/toile and observing it on the body. 


Now let's draft the bust darts. 

The width of the bust dart is approximately the difference between the overbust measurement L and the center front measurement l, as shown in the diagram below. I say "approximately" because the precise width depends on the features of the dart itself - its length, angle, and where on the bodice it is drafted. The final width of the bust dart is usually determined by draping and adjusting the muslin/toile, so don't worry about getting it right the first time. Remember, drafting darts is as much about Art as it is about Math.

As we discovered by draping Fleur in Part II, there are several places to put a bust dart. Let's do two common ones here. Each location will end up messing up one seam or the other.

Choice 1: Underarm
This location messes up the side seam but not the armscye.

In the diagram below, the black dart is an underarm dart and the black dot is the bust apex on the red bustline. We start by drawing the dart in, where its width = L-l.

Next, we adjust the reference lines that the dart messed up by being there. First is the waistline, which needs to be lowered at the side seam by the same amount as the dart's width. Visualize this: when this bust dart is sewn closed later, the waistline will shift back up to its true postion. We also redraw the side seam so that the two dart legs are now the same length. Visualize this: when this bust dart is sewn closed later, the two legs must meet at the ends so that the side seam is continuous and smooth.

Finally, we draw in the armscye, unaffected by the dart. Then we make a muslin to test the fit on the body, adjusting the width and exact angle of the dart according to the body's actual contours.

Q: When do we choose this bust dart position? 
A: When drafting for figures that are not particularly well-endowed. Or whose bust is situated lower on their chest. Or for garments in which the armhole fit is not particularly important e.g. women's button-down shirts.

Choice 2: Armhole Dart
This location messes up the armscye but doesn't affect the shape of the side seam much.

We begin by drawing in the dart opening into the armscye. Its width is L-l.

Then we lower the armscye by that same amount. We also lower the bustline and waistline at the side seam by the same amount. Visualize this: when this bust dart is sewn closed, the armscye will follow its original shape and the bottom of the armscye, the bustline and the waistline will all shift back up to their true positions.

Q: When do we choose this bust dart position? 
A: When drafting for figures that are more well-endowed and for whom armhole gaping is an issue. Or whose bust is situated higher on their chest. Or for garments in which the armhole fit is particularly important e.g. contoured sleeveless garments, garments with more fitted set-in-sleeves, etc.

As with the earlier case, the final angle and width of the armhole dart will be determined after draping the muslin on the body. 

The muslin fitting may also lead you to choose 
  • to split a particularly big dart into two or more smaller ones. 
  • to move the location of the dart to somewhere else altogether e.g. from the armhole to the shoulder.
  • a less snug fit to better flatter your particular contours, in which case you would deliberately make your darts shallower.
  • to change the balance between dart vs seam shaping - making curvier side seams + shallower darts instead of straighter side seams + deeper darts, or vice versa.


2 Refining fit with curved darts
Someone once said that there are no straight lines on the human body. Every contour is a curve, and therefore shaping those contours with straight darts doesn't make a lot of sense. However, drafting curved darts tailored to the specific contours of one individual could mean a poor fit for another individual with different contours, a luxury that commercial pattern designers cannot afford. Also, there are very few garments we'll ever wear in our lives that we want to be truly figure-hugging. So most of the time, we draft straight darts - the resultant garment may not reflect the wearer's true curves, but the shaping is sufficient so as to be flattering without being overly precise.

Sometimes, however, we want that precise shaping. In such cases, we use curved darts. These are often used around the bust area, because of all the various rounded contours therein. We met curved darts in this earlier post so I'm just going to adapt bits of it here.


Here are two common kinds of curved darts:

CONCAVE DARTS
We use concave darts to curve the fabric around a mounded area, like the side of the bust. Folks with an especially full and rounded bust might benefit from making an armhole dart that is concave;

it curves around the side of your bust more gently and does not peak in a nippley-looking dimple. 
bird's eye view of bust area
When sewn shut, the finished dart still looks like a straight line, but the fabric has been pinched in a curved way behind it.


CONVEX DARTS
We use convex darts to pinch more fabric in a particularly hollow area, like the region immediately under the bust. 

Side view - this underbust area is not a straight ramp:

a convex dart takes in more fabric at the apex of the dart where the body is hollower,

to produce a more closely-fitted profile


in garments that call for it.

Like the concave dart, the fabric is pinched in a curved way but, sewn closed, the finished dart itself looks like a straight line.


Here are some random sketches of profiles that correspond to differently-shaped waist darts: 


Summary: today's post was about the dart/seam choices we make for fit; the next post will be about the choices we make for design. See you soon!


Thursday, January 8, 2015

Excavating School Basements and Other Random Tales


In a few minutes, I'll be meeting a fellow mom volunteer to go exploring the school basement. Our mission: to find forgotten decorations from bygone eras to pretty up the school for the upcoming winter social. It's funny how this all began: people hear that Emily's/Jenna's/Kate's mom "sewed their Halloween costumes" and they translate this to "she must have interior decorating skills."

So not true.

Exhibit A: My house walls are still the same natural white that they were when we moved in almost a decade ago, except not as clean. "I had babies!" I tell myself and -defensively - anyone who mentions things like "painting" and "wall art" and "a bit of color might be lovely". Then my babies grew up and my walls are still eggshell - and I don't mean the finish - with only two possible reasons for it: my amazing prowess at procrastinating, or my total disinterest in decorating. 

It really is the latter. 

But it's also amusing how often it's assumed that sewing people or cardboard people or wood-crafting people have The Decorating Gene. I blame Martha Stewart, who set the bar so high for the rest of us one-skill wonders. One year, long ago when I was a teacher, our junior college (like senior high) ran a production of The Mikado. It was a whole-school effort, and everyone, including the teaching and non-teaching staff, were assigned jobs to make it happen. 

"Can I do costumes?" I offered. Because, you know, I sewed the prototype costumes for the school choir and did all the liasion with the tailor. Plus, it was all kimonos and obis and wonderful ethnic fabrics - everything I had a weakness for.

"No," the principal decided. "You're crafty; you get to decorate the front-of-house."

So I spent my afternoons painting stylized Japanese masks on long swaths of fabric to hang, like melancholy sheets of snow, ash and blood, from the ceiling of the theater. And all was not lost - I got to hang out with the Art Teachers, whom, I discovered while fabric-shopping with them, knew some of the best places on the island for lunch stops of minced-pork noodles.  

But back to the present, and the winter social. 
I'm happy to help, of course. It's for the kids and the teachers, after all, and whether the decorating team is truly skilled or just well-intentioned is beside the point - it's lovely to work with other moms to do something for the school. And, if all else failed, we have a stack of Oriental Trading Company catalogs to fall back on. 

It did, however, make me think about creativity and how it is both a blessing (mostly) and a curse. 

Two points:
One, I've decided, from now on, whenever I meet a person whose reputation precedes him/her as "creative" or "artistic", I will ask him/her, "What is your expression of choice?" Because I'd love to be surprised to hear options like writing, poetry, software, photography, architecture, the culinary arts, landscaping, hairstyling, code-breaking, scientific R and D, linguistics and translation, and anything else that may have nothing to do with pigment or fabric.

Two, I am slowly discovering the madness that is the creative mind on a deadline. Or maybe it's just a mad mind, period. It's astonishing how much goes on in my brain when I allow it to invent. There is no way to close the door once opened. And no way to be productive in the other areas of life that require to-do-lists and repetitive tasks and small, distracting details when I'm simultaneously creating. My favorite projects are the ones born of ideas that have had the luxury of months or years to percolate. By the time they emerge under the presser foot, or the glue gun, or the hammer-and-paint-brush, they are well-developed and problem-shot and effortless to actually produce. They have no returns other than the satisfaction of seeing them brought to life. 

Then there are the Assigned and Contracted Projects - the ones that usually have due dates and fat checks attached to them. These stretch me artistically and mentally because I have committed to pulling them out of a hat; they will still be beautiful on the outside, but they are not fully so on the inside- the result of an accelerated hatching. I think that is why I procrastinate - it is my desperate attempt to incubate an idea against a looming finish line. I always think that if only I could just "churn them out" and not care that they were not a true reflection of what goes on in my mind, I'd be far less tortured by those of my projects I call premature. 

And sometimes I can. But sometimes I can't. And I'm not unhappy at all; the torture is just a state of artistic and creative tension that propels me forward and higher. And that is the madness. Do you know what I mean?

Now that is far too much foolish and unnecessary introspection for the start of the new year. Most people do that at the end of the previous year. Like I said, I'm good at procrastinating.

And here's another bit of procrastinating to show you. 
My old wallet, made in 2009, is finally in its death throes. It's been terminally ill for a long time - all ratty and ripping fabric from my uncaring shoving into pockets and purses lined with pointy pens and ragged keys. The last straw was the coin compartment, which now consistently and energetically expels its contents onto the floor when I take the wallet out to pay for things in a store. 

So, this new year, I've decided that, after sewing for everyone else on the planet, I need to take care of myself. 

Here's the new coin compartment in progress - a pleated welt pocket. Have you ever made one? It's fun, but it's not for cowards (or members of the whip-up club).

And here's the coin compartment, finished. The rest of the wallet isn't.

Did you notice a bit of mass-production? If I was going to cut out one wallet, I thought, I might as well cut out three (the third is somewhere on my sewing table). The challenge, as always, is to tuck away all those raw seam edges so that it's as pretty on the inside as it is on the outside.

I'm going to keep one and maybe put the other two in the shop. Although I am tempted to keep both of these just so I won't have to procrastinate another 5 years for a replacement.

And I'm still working on my dart-drafting posts, friends. Believe it or not, Part III was so massive that I've had to split it into Part III and Part IV. Blows the mind, doesn't it, that just discussing darts would require four entire posts? 


Friday, January 2, 2015

Happy New Year!


No resolutions.

Just fabric.

This will be a bag.

This will be a lot more bags.

Nothing like starting a new year by procrastinating with goals.

Happy 2015, friends!
May your year be rich with the things that matter, 
and your days with the people you love.


Tuesday, December 30, 2014

Because, You Know, the VATMOSS Thing

So the new year is two days away and I've suddenly remembered that I need to discuss the EU VAT situation as it relates to ikatbag pdf pattern sales.

If you sell pdf patterns online, this will probably be old - and very annoying - news to you. Actually, it is a debacle. But, in the spirt of the new year, let's not go into details. The gist, as I understand it: if you, as a vendor, sell e-goods to buyers in the EU (excluding UK), regardless of how much or little they cost, those buyers have to pay the VAT of their respective European country and you have to charge for it - and they're all different rates for different countries - and register yourself and then pay those taxes to some Whosit, which is nightmarish in itself, but then you also have to find a way to collect at least two separate proofs of those buyers' addresses (assuming they're not lying), which you must then keep for x number of years (where, unless I'm misinformed, x = 10). 

The point is not just the petitions that are being signed against this law (which is rumored to eventually extend beyond e-goods to also physical goods), or the impassioned defence of small independent businesses that are marginalized in this move to call the Bigwig Megaconglomerates to account. The point is that, come 1 Jan 2015, these small businesses have to decide what they can do to work with this law. 

And so, it is with much regret and sadness that until we (as in The Whole World) figure out what else can be done with this law, I can no longer sell my pdf patterns to buyers in the EU. What does this mean for everyone?
  1. If you are from anywhere else but the EU countries in question (including the UK), please continue buying my patterns as before. Nothing has changed for you.
  2. If you are from the EU countries in question, do not buy my pdf patterns after Dec 31 2014 (that's tomorrow!!!). If you want my pdf patterns, email me (my email address is in my blog sidebar) and I will do the following:
  • sell you a physical CD containing the pdf pattern you want;
  • list it in my etsy store, plus postage, as a reserved listing for you to buy;
  • upon receiving your payment, also send you a free digital copy of that pdf pattern to your email address as an instant download (so you still get it immediately);
  • post out the CD containing your softcopy to your mailing address.

If the ludicrousness of this does not escape you, let us all shake our heads together. One does what has to be done, after all. Especially when one values one's customers, no matter what country (or planet) they hail from.

Two links FYI on this issue:

This one is very informative and has lots of links to other useful resources.
This one is much needed humor in these uncertain times. 

If you have any ideas or suggestions on how to work with this new law, or any comments, really, feel free to share them in the comments. I'd love to hear your strategies and thoughts. 


And now, let us look ahead to the new year with anticipation and gladness - may yours be full of gracious encounters, enriching relationships, good fabric and even better cardboard. Amen.


P.S. Dart Drafting Part III is on the way!

Thursday, December 25, 2014

Emily's Slouch Bag and our Christmas Gift To You


Merry Christmas, you guys!

This was a funny year for Christmas gifts. The majority of the handmaking was done by my kids while I got my gifts on amazon. Or out of my oven. What about you - did you handmake this year? 

Earlier this winter, the kids started making known their preferences for Christmas gifts. One of Jenna's requests was a bag that she could color with markers, which surprised us since she already had two such color-it-yourself bags. But those were small and more like handbags than true totes, so Emily decided to make her another one, in a more practical size.

Since Emily was going to be sewing this bag, it had to be simple to put together, without interfacing, hardware, fiddly straps. Or raw edges that required serging or hemming, either of which would have been extra work. So I drafted a very basic - it took me mere minutes to draft - slouch bag. 

Ta da! This is Emily's slouch bag, made for Jenna in a color-it-yourself home-dec fabric,

with a gusset that forms the base and the carrying strap

which ties at the shoulder.


The reverse side is a cupcake-print quilting cotton with a contrast pocket. Because Jenna adores cupcakes.

There were more curved than straight seams in this bag, but with basting, they were easy for even a 10-year-old to handle.

Because it was so much fun to make, I made one for Kate. Hers is in another color-it-yourself quilting cotton - this one allowing her to draw in animal bodies and outfits -

and the other side is a bunny-print flannel,

with a little gusset pocket.

I'd love to be able to say that Emily was bitten by the mass-production bug and made bags for all the neighbors, her classmates and teachers, our newspaper delivery guy, and random cashiers at the supermarket, but the truth is that after sewing Jenna's bag and Kate's portable stable, she was done handmaking for the year. She said, "I really want to make myself a bag, because it's so cute, but I'm tired. Can you make me one instead?"

So I did.

Hers is two layers of quilting cotton, with a contrast gusset on one side,


with an integrated-base-and-pockets gusset,


and a main-body patch pocket.

Here is the bag modeled by Fleur for size. You can see that while the bag itself is decently roomy, the strap is too short for an adult because it was meant for a child.


And unlike Emily, I have no problems mass-producing anything, so I made three more bags for gifts, and I took even more photos to show you some possible variations on the gusset-and-pocket construction.

Here's one in which this entire side is one fabric,

which makes the bag look rounder and smoother and not as segmented or angular as the ones with contrast gussets.

I made a quilted base, though. For fun.

Here's the other side - a patch pocket situated low just so I could align the print.

This side has a partial contrast gusset that has its gusset pockets integrated with the base. To do this, cut the base-and-pocket as one continuous strip, with the pocket double-layered and folded back onto itself. The top edge of the pocket is a fold, and the bottom edge of the pocket is merely a stitching line across both pocket layers, sealing the bottom seam. Then sew that onto the upper part of the strap.

Another one without a contrasting gusset - 

even the gusset pockets are of the same fabric.

This pocket is a simple patch pocket - cut double-layered and folded on itself over the top edge. The bottom seam edge is serged (this is the only place where there is serging in this bag) and folded inwards, then topstitched down.

This is the other side  - again, when made entirely in one fabric, it looks rounder and smoother.

We're back to contrast gussets with this next version:

This side has a patch gusset pocket that is attached the same way as the one in the butterfly fabric.


The other side also has a contrast gussset.


As our Christmas gift, here is the pattern and tutorial! This is a really fun and fast bag to make, and we love its lines and shape - all curvy and cute. It's simple enough for even a 10-year-old. So dig into your quilting cotton stash and go crazy! Gentle reminder: this pattern, as with all my patterns and tutorials, is for personal and non-commercial use only. 


Click HERE to download the pattern.


Some notes:
  1. Remember that my patterns/templates never have seam allowances, so please add your own around all edges except where that edge is placed on the fold of the fabric. I recommend 1/2" for bags.
  2. Because of the extra bulk at the junction of Point B (see template for this to make sense), the best fabric to use is quilting cotton or home-dec fabric for one of the layers (and quilting cotton for the other). Do not use anything heavier than home-dec, and avoid duckcloth. Also don't bother with interfacing; this is a slouch bag, so it's meant to be floppy and soft and interfacing makes the knot at the shoulder too bulky to tie. You can, however, interface or quilt the base portion of the gusset - the wine-colored calico bag in the above photos shows this variation.
  3. There is lot of pressing involved, so if you are making this with your youngish kid, be prepared to do all the pressing for him/her if they are too young to be safe around an iron.
  4. The strap templates need to be pasted together with tape, and can be lengthened for taller users (e.g. adults) - the pattern sheet gives some suggested dimensions and instructions, but feel free to adjust these to fit your needs. 
  5. There are reference lines on the straps to show you where to position the gusset pocket.
  6. Yardage-wise, I'd estimate a yard for each side (layer) of the bag to be safe; half a yard is too little and three-quarters is iffy, depending on how long you want your strap to be or whether you are making the entire side in that one fabric, or piecing a contrast gusset of another fabric.
  7. For each SIDE (layer) of the bag, you'll need to cut two body pieces and two strap pieces, which you should then join at the center seam AA to get a very long strap with both ends rounded where they will tie into a knot. 
Step 1
Piece the gusset into one continuous strip. If you want pockets, sew them on now. Their sides will be sewn, along with the gusset to which they are attached, to the main body of the bag.


Step 2
Attach the gusset to the main body pieces, one at a time. Line up the mid-seam AA of the entire gusset with the midpoint A of each of the main body pieces. I like to sew the gusset from A to B in each direction, instead of sewing from B to B through A. This way, I am sure that the midpoints A will match up. You might prefer to match up the B points on gusset and main body and sew from B to B through A.

Remember to leave an opening in one of the layers for turning out later. I left my opening (about 4"-5" around point A because it is straightest there and easier to handstitch closed later.

Here are some tips for sewing the gusset onto the main body. Clip halfway through the gusset's SA in the section that goes around the curved corners of the main body (see red arrows).


Like this - it will allow the stitching line of the gusset to perfectly meet the stitching line of those curved corners without puckering


to produce a beautiful and smooth corner. I don't pin or baste my rounded corners, incidentally - I just clip the SA and ease the fabric around the corners - fast, and effective. 


Another tip for getting that junction at point B to merge beautifully when you sew both bag layers together later: When your stitches run off the main body, taper them off to the edge of the gusset as shown by the black dashed lines. They'll be hidden within the SA of the gusset later. Don't be alarmed if your junctions are uneven like mine - see: one is higher than the other. Do I care? Am I freaking out? No. They'll still be symmetrical on each side of the bag.


Step 3 
Turn one layer RS out and insert that into the other layer, which is left WS out. The RS of both layers should be together. Line up the edges and sew all around the edges of the straps and opening of the bag to attach the layers together.

Here is how you'll be sewing in that junction B area. Remember the stitches running off towards the edge of the gusset? You can see them in white in the photo below. Now when you sew the layers together along the black dashed line, those stitches will be hidden within the SA of the gusset.

And those junction B's will be beautiful and smooth. Turn entire bag RS out through the opening you left in Step 2, press the seams and edgestitch all around the straps and bag opening. Handstitch shut the small opening.


Take the ends of the straps


and tie them into a knot.


Finished!

Have a wonderful Christmas and new year!!!