
Finally - we return to drafting.
This third installment was very hard to write. Not because the material was difficult - on the contrary, it was actually the most interesting so far to dissect - but because there was so much of it, in so many layers, all of which I felt I simply must include, and organizing and summarizing everything was quite the challenge. And part of the organizing involved splitting it into two separate posts, so that this drafting trilogy has now become a four-parter. This third post is the most technical of all the four and there will be a lot to digest, so, people, get ready!
In the earlier two installments here and here, we discussed what darts look like, why people use darts, where they could appear, and how big to make them in order to get the effect we want. All that was more Math and Science than Art: we created darts according to the contours we were trying to shape, and those contours dictated how long, wide and deep to make those darts, and where to locate them on a garment. All very objective. And thus far, there hasn't been a lot of choice or artistic license, let alone any drafting subtleties to speak of.
When people draft patterns (or slopers), they are drafting for either of two kinds of bodies:
- arbitrary industry models OR
- actual real individuals.
Arbitrary industry models are approximations to real human bodies. They take into consideration a variety of body types and ratios of vital statistics, but not actual individual flesh contours. They cannot, because there is simply too much variation in real life. However, this also means that people who draft for industry models can do so from measurement charts and grade their patterns into different sizes without actually looking at or measuring an individual body standing in front of them in their underwear. They shape the best generic template they can, call it a sewing pattern, throw in lots of design ease to increase the chances of it fitting more bodies en masse, and leave it to the home seamstress to adjust that template to fit their own, real contours.
Today, we will be drafting darts to fit single, real bodies, with real contours that bulge and sag and defy supposedly-standard bust-waist-hip ratios. This means that we will not be following pattern conventions, design features, size charts, grading rules or standard adjustments. It simply means that we will look at a body we want to make a garment for, and draft darts to fit that body. In the process, we will have somewhat unsystematic conversations about drafting darts. Forgive me if they come out of nowhere and meander about in broad, vague ways, but the conversations worth having are often like that, aren't they?
Here are two points to help focus our discussion:
1 Show me how to draft darts!
That was exactly what I wailed at my mother and aunt years ago when I didn't know anything about drafting. Translated, my ignorance sounded like this:
- Where do we put darts - where on the garment, and how are they oriented? Are there rules, is it a design choice or, worse, is it a free-for-all?
- How big (long, deep) do we make them? Is this always the same for all bodies? For each body? For each garment on each body? Is there a formula?
- Will they always be right? How do we know they are right? What does it look like if they're wrong?
Let's first talk about body shapes and muscle tone and youth and (for many of us) the lack thereof.
One of the first things about shaping that became clear to me over the years as I drafted was that darts and seams worked together in tandem, in some mysterious balance for which there were no fixed rules. I also realized, by observing other people's garment efforts, that there were no rights or wrongs in fit, only preferences and design choices. Even now, when I behold a dress on someone, and I scrunch up my eyes and frown at the way it fits (or doesn't), I am really thinking, "I wouldn't have drafted it that way." Or "I'd have used straighter side seams and deeper waist darts instead of those shallow darts and pinched waists that she's now wearing." And while I may think the fit is "poor" or "bad", I hardly ever think of it as "wrong". After all, it's still a wearable garment with holes to accommodate the wearer's arms and head, and it isn't tearing at the seams, and there are features like zippers and button plackets to allow the wearer to get in and out of it when needed. Instead, when I decide that the fit of a particular garment on a particular body is subpar, I really am only making a judgement on the choices the designer/seamstress made when constructing it. In other words, what I might think of as "too loose" or "too tight" may be something the wearer/designer/seamstress finds perfectly flattering and alluring.
In the same vein, every time I draft a sloper or garment pattern, I am making a subjective judgement on the relative degree to which I shape by seams vs. darts. Here, let me show you what I mean. In the diagrams below, the green lines are the seams (in this case, the side seams) and the blue lines are the darts (in this case, the waist darts). When I look at the contours of a body I am drafting for, I think of ratios and degrees. I ask myself, "How curvy should I make those side seams? How deep should those darts be? Which one should I use more for shaping the (let's say) waist - more darting or more seaming?"

We've talked about that before on ikatbag - in this earlier post on shaping skirts to fit. However, that was just the waist-and-hip region - today, we're focusing on the waist-and-bust: same concept, only in a more dramatic part of the anatomy.
Let's do some drafting together to illustrate that on paper.
Drafting for a woman's upper body follows the same sequence as that for a child - plot the neckline, shoulder point and slope, then mark the bust/chest and waist reference lines. Then plot the darts.
The first dart we plot is the vertical waist dart. The bust dart comes later.
Here is that old diagram again from Part II, showing our visual explanation for the origin of the waist darts. It is actually more accurate to say that the difference between the red and blue measurements is the waist shaping or the waist ease that we need to deal with.

Now let's look at how we precisely calculate and deal with that waist shaping by actually plotting the darts on a draft. Note that in the diagram below, we're measuring only the front of the body; because the front contours are very different from the back contours, we NEVER measure around the whole body and divide that measurement by two as we casually did in the illustration above, as if the front and back were equal halves.
The front bust measurement B (red) and front waist measurement b (blue) are themselves halved for the one-sided body plot, and these measurements reflected in the length of the red and blue lines.

At this point, we can make one of three choices:
Choice 1: Shape Only By Side Seams
We assign all the waist shaping responsibility to the side seams. There are no waist darts. We simply connect the end of the bust line to the end of the waist line into a very nipped-in side seam.

Q: When would we choose this?
A: For bodies in which the chest-waist difference is quite small, or for whom the chest-waist difference is mostly concentrated in the sides, not front, of the body. For example, children, men and slender female adults with relatively flat chests or wide waists, or both.
Choice 2: Shape Only By Waist Darts
We could also swing to the other extreme and shape by darts only. To do this, we extend the blue waist line so it is the same length as the red bustline. That extra extension is the width of the waist dart.

Now, we draw the side seam from bust to waist and - if we like, extend it further towards the hip and complete the two-pointed waist dart. From the bust to waist, the side seam is perfectly vertical; all the waist shaping is done only by the waist dart.

Q: When would we choose this?
A: For particularly well-endowed women who also have wide waists, also post-natal figures, with their doughy midriffs fresh from a recent birth. From the front, these figures will not look particularly hour-glass-y, but from the side, there is a pronounced difference between their bust and their waist contours. Therefore, the sides of their waists need very little shaping but their underbust areas, which are very hollow, would benefit from a deep waist dart.
Choice 3: Shape By Both Side Seams and Waist Darts
Most people's bodies and garments fall in this category. The judgement call in this situation is not just the choice of partial dart-seam shaping over exclusively one or the other but also the degree to which the shaping is done with darts vs. seams.
To draft this, we pick a dart width that is less than the full difference between bust- and waist- measurements. How much "less than" is the judgement call I mentioned earlier, and it is one of the many subtleties of dart drafting.

Then we extend the waistline by the width of this waist dart. Then we connect the ends of the bustline and waistline. We now have a less-angled side seam than in Choice 1 and a smaller waist dart than in Choice 2. The waist shaping has been shared by the side seam and the waist dart.

Q: When do we choose this?
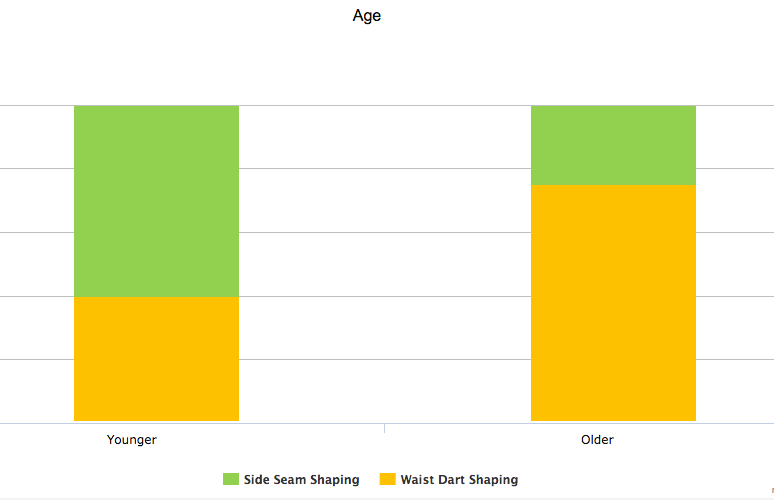
A: Most garments, for most people. However, the degree to which we swing towards either more dart, less seam or less dart, more seam depends on many factors including (as we mentioned) age, body type, body shape, muscle tone, distribution of body fat in the midsection, and even the kind of garment on the same wearer. For instance, a more tailored garment (e.g. a fitted blazer, a wedding gown, a corset, a qipao) might have a different dart-seam combination than a garment that hangs more loosely about the body (e.g. a shift dress, a button-down shirt, a Tshirt).
Here are some very arbitrary bar charts to illustrate that degree to which we might choose to shape the waist by seam vs. dart. I picked three random categories - age, natural contours and type of garment. A different seamstress or designer might have have preferences that result in completely different-looking bar charts. As I'd said, while there is logic behind the preference, it's still subjective.


Q: How do we know we've picked the right ratio of dart vs. seam shaping?
A: When the resulting garment sits well on the body, without pulling of the fabric in weird directions. Often, we'll only know this after making a muslin/toile and observing it on the body.
Now let's draft the bust darts.
The width of the bust dart is approximately the difference between the overbust measurement L and the center front measurement l, as shown in the diagram below. I say "approximately" because the precise width depends on the features of the dart itself - its length, angle, and where on the bodice it is drafted. The final width of the bust dart is usually determined by draping and adjusting the muslin/toile, so don't worry about getting it right the first time. Remember, drafting darts is as much about Art as it is about Math.

As we discovered by draping Fleur in Part II, there are several places to put a bust dart. Let's do two common ones here. Each location will end up messing up one seam or the other.
Choice 1: Underarm
This location messes up the side seam but not the armscye.
In the diagram below, the black dart is an underarm dart and the black dot is the bust apex on the red bustline. We start by drawing the dart in, where its width = L-l.

Next, we adjust the reference lines that the dart messed up by being there. First is the waistline, which needs to be lowered at the side seam by the same amount as the dart's width. Visualize this: when this bust dart is sewn closed later, the waistline will shift back up to its true postion. We also redraw the side seam so that the two dart legs are now the same length. Visualize this: when this bust dart is sewn closed later, the two legs must meet at the ends so that the side seam is continuous and smooth.

Finally, we draw in the armscye, unaffected by the dart. Then we make a muslin to test the fit on the body, adjusting the width and exact angle of the dart according to the body's actual contours.

Q: When do we choose this bust dart position?
A: When drafting for figures that are not particularly well-endowed. Or whose bust is situated lower on their chest. Or for garments in which the armhole fit is not particularly important e.g. women's button-down shirts.
Choice 2: Armhole Dart
This location messes up the armscye but doesn't affect the shape of the side seam much.
We begin by drawing in the dart opening into the armscye. Its width is L-l.

Then we lower the armscye by that same amount. We also lower the bustline and waistline at the side seam by the same amount. Visualize this: when this bust dart is sewn closed, the armscye will follow its original shape and the bottom of the armscye, the bustline and the waistline will all shift back up to their true positions.

Q: When do we choose this bust dart position?
A: When drafting for figures that are more well-endowed and for whom armhole gaping is an issue. Or whose bust is situated higher on their chest. Or for garments in which the armhole fit is particularly important e.g. contoured sleeveless garments, garments with more fitted set-in-sleeves, etc.
As with the earlier case, the final angle and width of the armhole dart will be determined after draping the muslin on the body.
The muslin fitting may also lead you to choose
- to split a particularly big dart into two or more smaller ones.
- to move the location of the dart to somewhere else altogether e.g. from the armhole to the shoulder.
- a less snug fit to better flatter your particular contours, in which case you would deliberately make your darts shallower.
- to change the balance between dart vs seam shaping - making curvier side seams + shallower darts instead of straighter side seams + deeper darts, or vice versa.
2 Refining fit with curved darts
Someone once said that there are no straight lines on the human body. Every contour is a curve, and therefore shaping those contours with straight darts doesn't make a lot of sense. However, drafting curved darts tailored to the specific contours of one individual could mean a poor fit for another individual with different contours, a luxury that commercial pattern designers cannot afford. Also, there are very few garments we'll ever wear in our lives that we want to be truly figure-hugging. So most of the time, we draft straight darts - the resultant garment may not reflect the wearer's true curves, but the shaping is sufficient so as to be flattering without being overly precise.
Sometimes, however, we want that precise shaping. In such cases, we use curved darts. These are often used around the bust area, because of all the various rounded contours therein. We met curved darts in this earlier post so I'm just going to adapt bits of it here.
Here are two common kinds of curved darts:
CONCAVE DARTS
We use concave darts to curve the fabric around a mounded area, like the side of the bust. Folks with an especially full and rounded bust might benefit from making an armhole dart that is concave;

it curves around the side of your bust more gently and does not peak in a nippley-looking dimple.
 |
| bird's eye view of bust area |
When sewn shut, the finished dart still looks like a straight line, but the fabric has been pinched in a curved way behind it.
CONVEX DARTS
We use convex darts to pinch more fabric in a particularly hollow area, like the region immediately under the bust.

Side view - this underbust area is not a straight ramp:

a convex dart takes in more fabric at the apex of the dart where the body is hollower,

to produce a more closely-fitted profile

in garments that call for it.

Like the concave dart, the fabric is pinched in a curved way but, sewn closed, the finished dart itself looks like a straight line.
Here are some random sketches of profiles that correspond to differently-shaped waist darts:

Summary: today's post was about the dart/seam choices we make for fit; the next post will be about the choices we make for design. See you soon!

Awesome information clearly explained. Thanks for laying it all out. Makes me think drafting for my changing shape may not be insurmountable after all :-)
ReplyDeleteReally interesting, thank you for sharing this
ReplyDeleteThank you so much for taking the time to do this!! I love your charts and graphs. As someone who is constantly having fit issues, this is a tremendous help!
ReplyDeleteThanks for such great food for thought! Is a sloper the same thing as a pattern?
ReplyDeleteI bought a cool old book in the thrift store yesterday. How to Make Clothes That Fit and Flatter by Adele Margolis. 1969. It shows many of the same techniques you are going over and it is giving me a nice comparison. I always print these awesome posts out to keep with my sewing books.
ReplyDeleteI have some "shape issues" so these are great.
Next step is to make my own Fleur.
Allison: I must get my hands on that book someday! I've heard other people mention it, as well, but I've never read it. Thanks for the recommendation!
DeleteHow wonderfully clear and useful! Thank you so much!
ReplyDelete-HannahS
amazing - thanks so much for this. is making me think about how i adjust for different sizes between bust and waist. i would normally just grade out at the waist, but from this that might not be the best option. thank you!
ReplyDeleteThose body type graphs are really helpful! You are the only person I have ever seen make a curved-seam dart, but it makes a lot of sense.
ReplyDeleteI always feel like my head is going to burst open from new information after reading any of your drafting series. I often go back and re-read a few times because each time I get more nuance.
ReplyDeleteOnce again, a great series. You must have been a fabulous physics teacher!
ReplyDeleteIncidentally, thank you for including tips/theory on drafting for those of us who are less-well-endowed. I am small chested and very long in the torso, both above and below the bust. I could almost wear a rectangle and call it good. One can find all sort of tips and examples for drafting for large women but no one ever includes the opposite scenario in their tips/tutorials/theory as if its intuitively obvious. Thanks for extending your theory in both directions.
good one
ReplyDeleteHmm, if I add a 1 inch underarm dart, do I tilt the waist 1 inch lower at the side seam?
ReplyDeleteIt depends on what you mean by "add", and when (i.e. which part of the construction/alteration process) you do the adding. But the short answer is "yes, you would lower the waist by 1" at the side seam" in practice.
DeleteOoh, thank you! I should have been clearer: I have an undarted bodice pattern with straight side seams and want to alter it to have an underarm dart (preserving the shape, length etc. otherwise). And I would add 1 inch of length to the side seam as well, then draw in a new hemline?
DeleteSorry, when I say 1 inch dart, I mean a total of 1 inch (1/2 inch on each side of fold).
DeleteYes, you'd add 1" to the length of the side seam on either side, then draw a new waistline 1" lower than the original, and a new hem (assuming your bodice extends below the waist to, say, around the hip for a blouse) that's also 1" lower. You may want to lower the center front by 1" as well and draw a waistline that's straight across, but this will give you a bit of a natural dip in the center front in the finished garment when the darts are closed. Because of the curves of the body, this can look as natural as a true horizontal hemline. If you'd rather a perfectly straight hemline (or waistline), you can lower only the side seams but not the center front. When the darts are closed, the waistline will revert to being horizontal (in theory).
Deletethank you! i learned sewing from reading blogs and watching instruction videos. one of my blouses bunches up, i'll put darts on the next one to improve the fit.
ReplyDeleteThis has been just about the most useful article I've read on the subject (and I've been struggling with my own fitting shell for weeks). But I think you may have convex and concave confused.
ReplyDeleteUnknown: yes, you're right - I didn't think about concave being the final effect of the shaping and instead referred to the dart itself (convex) as drawn on the paper pattern. Thank you for pointing that out.
DeleteI have a dart size question: I usually wear very large bras (14G in Australian sizing).
ReplyDeleteWhen I measure Full Bust and High Bust there is an 11cm difference.
When I measure Neck to Waist between and over breasts, there is only a 4cm difference.
If I measure Neck to Underbust between and over breasts, there is a 12cm difference, so I think my post-baby belly blubber is messing up my measurements! (Sadly my waist measurement is larger than my underbust, but not enough to justify still wearing maternity shirts.)
Looking down into my cleavage, my breasts protrude 7cm from my rib cage.
Should I use a 4cm side dart or 12cm, or something in between? I usually follow Winifred Aldrich, but the bust dart/armhole shaping has always been weird and is worse than ever after bub!
AA: Unfortunately, without seeing you in person, I am unable to suggest what numbers to use. However, it sounds like you have a good understanding of the different factors that affect shaping. For instance, you are aware that the cup size (or bust measurement) alone mean very little, and that measurements taken from different angles reveal very different things about the same bust shape. That is a good place to start, so be encouraged that you are further along in your instinctive drafting knowledge than you might think.
DeletePerhaps the most useful consideration is the actual shape of your bust, and how that CONTRASTS to the other contours around it e.g. your midriff area, the space between the sides of your bust and your arms etc. From your description, it sounds like the greater "hollows" are midchest between your breasts and above them.
Other questions to ask: what is the "spread" of your bust, how shapely vs drapey do you want your garment to be, where do you want the bust darts situated (armhole, underbust, shoulder, etc).
For a first muslin (and without actually seeing you in person, so I'm kinda shooting in the dark here), I'd suggest
(i) using a little less than 12 cm difference to draft armhole darts but
(ii) situating the dart points not exactly at the bust apex i.e. maybe an inch before the apex, for gentler bust shaping
(iii) using a small underbust dart, if at all and
(iv) if any waist shaping is desired, using shaped side seams instead of underbust darts
(v) shaping the neckline in some way to prevent gaping
and then making changes to that first muslin. You should be able to see right away where the problem areas are, because the muslin will drape your actual contours, and not just be a physical representation of the measurement numbers.
Hope this helps some!
This was a very detailed post. Lovely. You are a treasure house of information :) thanks for sharing. I have a simple question, hope you would choose to answer it. I have read some pattern making books which describe dart manipulation techniques. Here it is told that once we get a good fit the dart can be manipulated to any location and the final 3D shape of the bodice will remain same. This slightly contradicts with your explanation, where we have to choose the dart location based on body shape for good fit. Any thoughts on this please.
ReplyDeleteDiya, that is a good question. Those pattern books are also right. The theory of dart rotation/dart manipulation is exactly that: darts CAN be interchanged to move ease around to places of preference (or convenience, such as in styling a garment). The challenge is in getting that good fit. Sometimes a good fit is obtained only after choosing to place darts in certain places over other places for particular body shapes. Some figures are more easily fitted with certain dart locations (meaning they can still be fitted with darts elsewhere but it might not be as simply done, and might require more darts or seam shaping along with darts, etc.). Also, people define "a good fit" differently - what is just right to some of us might be too tight to others, or too loose to yet others. Over the years, my own definition of "a good fit" has changed as I understand drafting more. I cannot recommend muslins enough. They can help us best see (and feel) the effects and relative advantages of darts in different places on the draft. Hope this has been helpful.
DeleteWhenever I do a search for fitting help your blog seems to always come up, which doesn't surprise me - I always find something new (to me) and helpful. So my question is: are there basic "rules" for creating darts about which I should be aware? Like, the dart legs can be no more X wide for Y long? Is that why my darts don't always lay flat against my contours but have a bit of excess fabric? Background: I have a 44" bust with a 39" upper bust/chest and 38" lower bust/ribs so getting smooth darts is a challenge. Most sewing patterns have the bust vanishing point right *on* my apex (!) and the last thing I want is the dart point ending there! But getting one *large* dart to lay smoothly is not something I've achieved and I wonder if there's a geometric law somewhere that I'm breaking that will not allow me to create a smooth dart so I have to create two?? Thoughts?
ReplyDeleteVee: this is a great question! Having never worked in the fashion industry, I can only share what I've learned from drafting as a home seamstress. First, it is rare (but not impossible) to achieve a perfect fit with the first draft. We work with geometry and plot lines as best we can with the dimensions we take from a human body, but those lines are theoretical at best. For instance, drafts are typically drawn with straight lines, but there are no actually straight lines in a human body. I've found that it is normal to reposition seam lines and darts (and sometimes quite dramatically change) after fitting the first muslin. Dart points landing on the bust apex itself are not uncommon in the first draft - sometimes the shape/slump of the person's actual bust cannot be detected from their bust measurements and the apex may fall differently "in person" than expected.
ReplyDeleteSecond, I've found that curved darts can shape contours more closely than straight darts. This might help with with greater differences between the bust and lower bust dimensions.
Third, sometimes the location of the dart might be more useful than the size. For instance, a single dart (even if it's large) opening into the armhole may better shape the bust area for a well-endowed person than two smaller underbust/waist darts. I'd say try different locations in your drafts to see if your body contours respond better to some more than others.
Good luck!