
Welcome back to Zip A Bag!


To my consternation, that post got pinned multiple times on Pinterest.
I tore my hair out.
Gnnnnnrh. Did I not say, "Do Not Learn This" ?
And did you not notice that it wasn't even a real chapter, because the pouch wasn't even in real fabric? I mean, it was just plain canvas that my children scribbled on.
Then I consoled myself with the thought that maybe it was because you guys liked the monster pouches themselves, and not at all because of the (shoddy) technique which I entreated you not to learn. Okay. I can live with that. So let's put that all behind us and move on.
Today, we're starting the real, good zipper techniques. In other words, from this post onward, go ahead and pin - you have my beaming approval. Because - sound the trumpets! - the real Zip-A-Bag lessons begin now.
Some background and acknowledgements first. Back when I conceptualized this tutorial series, it was to fill gaps in the field of on-line bagmaking instruction. I mean, there are loads of zipperless tote bag tutorials in crafty blogland. And a few zippered gussets (e.g. cosmetic cases, suitcases, overnight bags). And absolutely no end of zippered pouches, usually of the flat, zippered-edge variety.
In other words, what I've seen are zippers opening and closing things, period. I haven't seen much (if any) of zippers changing the volume or shape of bags, or zippers transforming straps into other straps. Or even zippers being installed in ways whose mechanics are wonderful and cunning in and of themselves, that make you think, "Wow, I've never thought about putting a zipper in that way."
Perhaps I've missed them (not having the time to be online 24/7), but it made me excited to possibly teach you something new so we're not just going around sewing the same old things and breathing the same old didactic air.
Around the same time that I began drafting and sketching the bags to illustrate those new techniques, my friend Jessica Jones was getting ready to launch Time Warp, her first barkcloth fabric line with Cloud9 Fabrics. And I fell in love with it: the texture, the print, the colors - everything. So I asked her if she'd let me feature Time Warp in my tutorial series and she said yes, and Cloud9 sent me delicious yardage and we were ready to go. So excited!
Then life happened. Boy, did it happen. It still makes my blood boil somewhat to remember exactly how it happened.
But! But! I've vented enough, and both Jess and Cloud9 have been so graciously, luxuriously patient, so let's forge ahead and deliver what I hope will be a tutorial series worth the wait. Thank you, you guys, for not giving up on me!
So! Today's tutorial is about
- fully-covered fabric stops for
- installing a faced zipper in
- a fully-lined pouch by
- split seam allowances.
To illustrate all those techniques, we will be making a flat pouch with a central zipper.


which, structurally, is exactly the same as the monster pouch, except properly lined.

We'll start with a zipper that joins two outer front half pieces, and an outer back piece.
Duplicate those fabric pieces for the lining layer.
And add a fabric end tab or two, and four small pieces of fabric for fabric stops.

STAGE 1: FABRIC STOPS
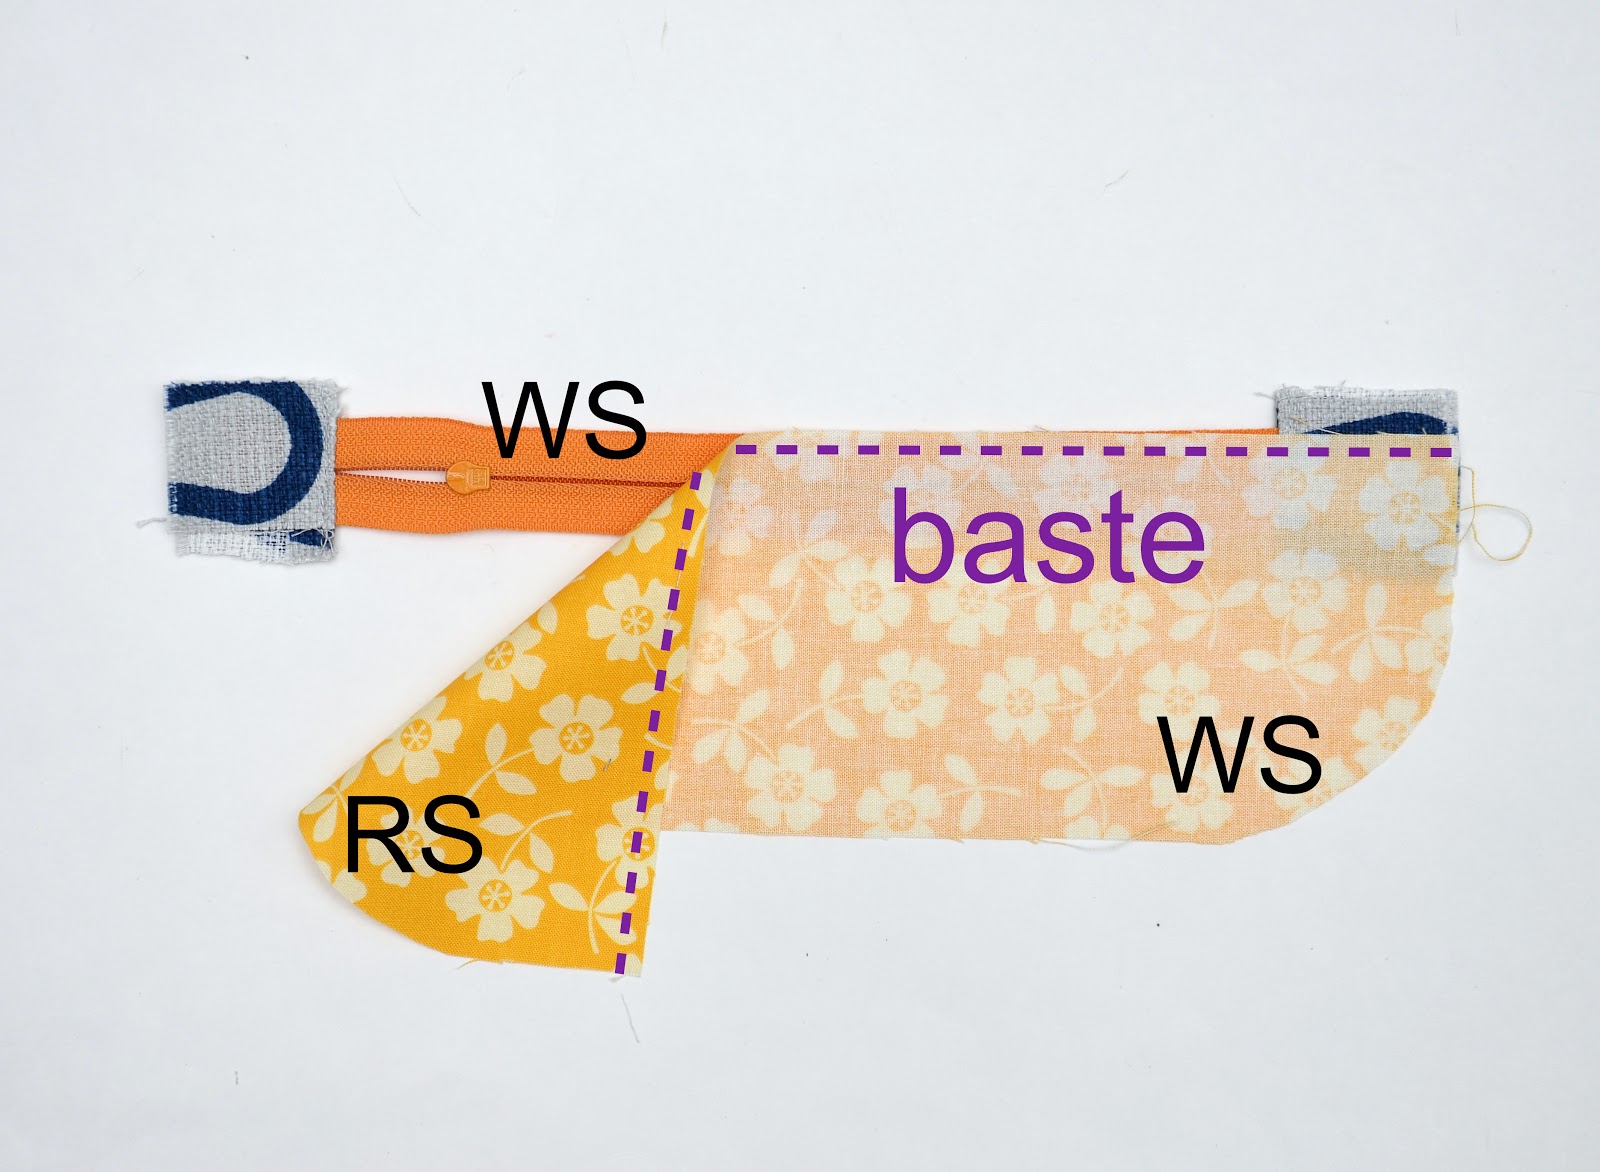
First, we're going to prep the zipper by adding fabric stops. In the earlier post (the one you shouldn't be pinning), the zipper was unfaced, so we added fabric stops to only the RS of the zipper. The pouch in today's tutorial is lined, so the zipper is faced with that lining fabric. Correspondingly, our fabric stops will cover both the RS and WS of the zipper ends.
You will need two fabric stop pieces for each end of the zipper. The width of these fabric pieces should be at least the width of the zipper tape. Begin by laying the WS of the zipper on the RS of one fabric piece. The purple dashed line shows where we will be stitching - the metal stops will be in the SA region of the resulting seam - we want them to be hidden.

Lay the second fabric stop on top of the first, so their RS are together, sandwiching the zipper between them. Sew through all layers along that purple dashed line.

Fold back both fabric layers to sandwich the SA between their WS. Topstitch (one or two rows) close to the fold to hold all the layers in place. The fabric stop is completed.

Repeat this on the other end of the zipper,

removing the metal bottom stop with a small screwdriver if it gets in the way of the stitching lines.


The zipper is now prepped for installation!
STAGE 2: INSTALL THE ZIPPER
Now we will install the zipper. Here is the zipper between the two halves of the front of the pouch, showing how they will fit together. We will be sewing the straight sides of the front halves to the zipper tape.

Because this is a lined pouch, the outer and lining layers will share a single zipper, and they will be attached to that zipper along the same seams. Therefore, we need to attach the zipper to both layers simultaneously before assembling the rest of the pouch. This paragraph will make a lot more sense after you've read the whole tutorial. Come back and re-read it again then - you'll see what I mean.
We will work on one side of the zipper tape at a time. Begin by laying the zipper WS up on your work surface and one front half of the lining layer RS down on top of it so their straight edges align as shown. Baste in place within the SA region (translation: sew with long stitches far away from the actual stitching line).
Flip this over so the zipper and lining piece are both RS up. You can see the basting stitches in the photo below. Note that the edge of the zipper tape is not perfectly lined up with the edge of the lining fabric. It's my own idiosyncratic SA thing: as a habit, I use a wider SA (1/2") for my fabric pieces than the width of the zipper tape (3/8"), and this is how I ensure their stitching lines (of the zipper tape and fabric are superimposed. You do what works for you with your preferred SAs, okay?

Now let's add the outer fabric. Lay one outer front half RS down, as shown, sandwiching the zipper between the fabric layers. Line up the applicable edges and sew along the actual stitching line, through all the layers (the basting stitches from the previous step will be hidden in the seam).
However, stop a SA's width from the edge of the fabric on either end i.e. do not stitch to the edge of the fabric - leave the SA regions free, backstitching where you started and stopped. This is crucial to sewing lined pouches and bags whose layers are connected at the zipper. We will return to this "free SA" later.

Flip over the two fabric layers to expose the zipper. With their WS together, press the fold and topstitch to hold in place. Again, leave the SA ends unstitched.

Repeat the steps to attach the other fabric front halves, remembering to leave the SA ends unstitched.

Done correctly, the outer side will look like this,

and the lining side like this - with the topstitching (shown in purple dashed lines) extending only up to the SA region. The lining layer hides the edges of the zipper tape, and the fabric stops hide its ends - in other words, we've faced the zipper with this lining fabric.

You will now have all the front fabric pieces connected to each other at the zipper, making a kind of fabric sandwich.
STAGE 3: ATTACH THE BACKS
Now let's talk about that "free SA" thing we alluded to earlier. If you peel back the ends of the fabric sandwich, you will see that the layers are separate within the SA region, because you didn't sew them together in Stage 2.

Remember that double-layered fabric stop you attached to the ends of the zipper in Stage 1? Part the two layers of that fabric stop, and assign one to the outer layer of the pouch and the other to the inner/lining layer, as shown. You will now have a full, separate SA all around the edge of the pouch in each front layer to sew to the back of the pouch.

No doubt your eyes are glazing over now, so let's plough on, so you can see how that works. Let's add a fabric tab at the end of the zipper, just for fun. Baste it facing inward (and only through the outer fabric layer! Pull the lining layer out of the way!), as shown.

Lay the outer back piece on the outer front piece so their RS are together. I've left the front pieces a little bigger than the back to match the print at the zipper seam, and also for better visibility of the layers in the photo below. You can trim off the excess later.
Sew only through the outer fabric layers, stitching all around the perimeter as shown, carefully pulling the lining layer out of the way underneath. I use a zipper foot to get really close to the ends of the zipper where there is only a SA-width of fabric. What you've done here is sewn a complete pouch of the outer fabric.

Repeat this with the lining layer now, to attach the back lining piece to the front lining piece, pulling the finished outer pouch out of the way of your stitches. Leave a gap along one straight side for turning the entire pouch RS out later. Remember that you are assembling one layer at a time - first the outer as a complete pouch, and then the lining as a second, complete pouch. Both of these complete pouches are attached to each other ONLY at the zipper.
Trim the SA and turn the entire pouch RS out through the gap in the lining. Stitch shut that gap. I recommend ladder-stitch rather than machine-sewing; you took such pains to make a beautiful lining; why ruin it with a hideous machine seam?
You will now have two identical pouches connected at the zipper seams, and with all SA hidden. Stuff the lining back into the outer pouch.
Finished!


Here is the pouch turned inside out to show the lining. Observe the perfectly faced zipper,

with its beautiful fabric stops, even on WS of the zipper.

In the next chapter, we'll continue with this central-zipper technique and add darts to make a 3-D boxy pouch. Check back again soon!

This is such a great idea for sewing together the parts of the zipper ends! I've always had problems with that. Thank you soooo much! ��
ReplyDeleteDoris
Thanks for sharing your knowledge! I love your tutorials. Once I sewed a pouche with this technique but I found it difficult to sew the free part of the seam allowance. I prefer sewing the exterior and lining together, so the pouche is connectect by all seams. Why do you prefer two separate pouches just attached by the zipper?
ReplyDeletediario de naii: how do you deal with the SA if you connect both layers together? Do you bind them at the last step?
DeleteLier, I did a post last year ( http://diariodenaii.blogspot.com.es/2015/02/truquillo.html?m=1) but is in spanish. I will try to explaim with my poor english. First I sew in the two exterior pieces where should be the gap place in the lining ( :-S make sense?) . Then sew all around the 2 exterior pieces and 2 lining pieced leaving the gap . And sew the gap.
DeleteAh yes! I remember that technique! I have used it (not exactly the same - I sewed the SA of the lining and the SA of the outer together in two steps) before, and it is very useful. Thank you for sharing your link. I hope my readers go to your blog and read that post.
DeleteI am going to leave my "split SA" method here still, because it will be useful for the backpack tutorial later, where we sew the off-set seam zipper to both the lining and outer gussets. Sounds horrible, I know, but it's actually the same technique, just a different shaped bag.
Great! I am looking forward to see the backpak! the non-split method is perfect for lazy hurried moms :-))) like me !!!
DeleteJust want to say that the next time someone asks me if I've made any New Year's Resolutions, I plan to say, "Yes! I resolve to stop breathing the same old didactic air!"
ReplyDeleteWill keep you posted on reactions ;)
Brilliant! I'm really looking forward to the test of this series!
ReplyDeleteGreat tutorial! Simple, clear directions are wonderful. Why not make (sell) your series as an E- book?
ReplyDeleteLove it! Well worth waiting for. I can't wait to try this out, but I must confess that I will probably make my zipper fabric stops as one in exterior fabric, one in interior fabric so the interior looks more uniform (I like matchy-matchy).
ReplyDeleteWell, that's very nifty! I've never used 2 pieces for the zipper tab before. I like it! Sooo... one perfectionist (an anal one, as I fondly recall being labeled) to another... why not use lining fabric for the bottom of the tab so that your finished lining is all the same fabric?
ReplyDeleteGrandma G: You totally can! I think it would look more matchy-matchy (as commenter #6 said), but I'd not sewn bags or pouches with loud, bright print fabric until I started blogging, so I never bothered with matching lining fabric to stops etc. When I sewed bags back in the day, they were all solid nylon or cordura or some other thick outdoor fabric - I made fabric stops deliberately contrasting, especially on the OUTside of the bag. Very different look - more sporty and rugged than pretty.
DeleteSo match your lining to your stops, if it's your thing - there are no rules for that!
Grandma G: You totally can! I think it would look more matchy-matchy (as commenter #6 said), but I'd not sewn bags or pouches with loud, bright print fabric until I started blogging, so I never bothered with matching lining fabric to stops etc. When I sewed bags back in the day, they were all solid nylon or cordura or some other thick outdoor fabric - I made fabric stops deliberately contrasting, especially on the OUTside of the bag. Very different look - more sporty and rugged than pretty.
DeleteSo match your lining to your stops, if it's your thing - there are no rules for that!
Ooooh I'm excited about the series! Thanks for explaining how the inner and outer layers are only connected at the zipper--I don't think I've understood it before.
ReplyDelete-HannahS
Wonderful, wonderful posts - thank you so much for your generosity -- and of course, the time that it must have taken to put the tutorials together! [I don't know how a busy Mum is able to do that so with such apparent ease and good humor!!] It's much appreciated - I am looking forward to some New Year spare time to work through the processes. .... and the Cloud 9 fabric is lovely...
ReplyDeleteI pinned your monster pencil cases. They are awesome!
ReplyDeleteI do look forward to learning PROPER zipper technique through this series :)
The monster bags are a cute first zipper project for kids to sew! Thanks for this post - the insides of my bags never looked this good. Does it matter if the zipper is open or closed when you sew the inner and outer parts and then flip them?
ReplyDeleteBeccy: it doesn't matter if the zipper is open or closed; you'll be turning the whole pouch RS out through the gap in the lining.
DeleteThank you. I think I can do this! Looking forward to the rest of the series.
ReplyDeleteI have never thought to do an inner tab before but it makes so much sense and looks very neat. Thank you for the tutorial and I look forward to the next.
ReplyDeleteps I pinned the pencil case because I thought it would be great for my grandchildren to make.
Wonderful posts, thank you for these tutorials. But since English is my second language, I did not understand SA. What does that stand for? :)
ReplyDeleteAylin: SA = seam allowance. Hope this helps!
DeleteOf course it is... :D Stupid me!!! Thank you :D :D
DeleteI have made many bags and pouches (including many of your wonderful Better Marker Pouch) and I figured I probably knew everything you would cover in this post, but you have definitely taught me a couple of new techniques today. I've done many lined pouches where you sew straight across from the outer fabric to the inner, but I really like your technique of leaving the seam allowance free and sewing both separately. It looks like it avoids the awkward, lumpy seam you get on the zipper corners.
ReplyDeleteHey Katie! How are you?
DeleteI hadn't really thought about lumpy seams at zipper corners, maybe because I hardly use the not-separate SA method. But then again, I hardly use that not-separate SA method to avoid getting bulky SA throughout the bag/pouch (see reply to a comment in the next post which asked a similar question to commenter #2 in this post) so maybe that's saying the same thing.
I'm doing great thanks LiEr. We are back in Singapore after a lovely Christmas visit to our families.
DeleteYes, those bulky corners have really irritated me in the past, and I didn't know how to fix them. I'd like to have another go now using your separate SA method and see how they work.
Thank you for the series. Am working my way through the techniques. I have one question though. When you cut the one piece back panel do you allow extra for the fact that the front pieces have the "extra" zipper fabric in them?
ReplyDeleteHelen, I cut the back piece bigger in this case simply to match the print. If the print were very small (or it it were a solid fabric), I'd cut them the same size (taking into account the zipper SA of the front pieces). But with a large-repeat print like this, I wanted to be sure I had some wiggle room for lining up the front-back print at the seams (which I didn't do a fantastic job with, anyway).
DeleteThank you. Have made myself a handy pouch to keep scissors in!
ReplyDeleteI like the teqnique for the zip ends. It' cool and neat. I have also been trying some of your other bag making teqniques, they make sewing bags so easy THANK YOU!
ReplyDeleteKeen now to try the separate sewing of the layers. Like earlier posts I too don't like the chunky ends. Thankyou
ReplyDelete