
Happy new year, everyone!

Well, this post didn't make it before Christmas. Or in 2023, for that matter. Not surprised, given how busy December tends to be. I hope everyone's Christmas and New Year - or other celebrations of the season - were lovely. We had no snow in the Twin Cities over Christmas, which was bizarre. Nobody really complained, being Minnesotan and all, but people were discombobulated to say the least. Do we wear shorts or pants? Do we make the hot chocolate and bring out the tie blankets even though it's 54F? Do we still sing songs about White Christmasses and Snowmen and Coldness even though it's practically tropical outside? One of my friends said, "This is Minnesota. The snow will come. It's not if . . . it's just a matter of when." And whaddya know - yesterday, it turned up. A couple weeks late, but still.
Still, Christmas was lovely. The kids later said it was one of their favorite ones in recent memory, even though the youngest two were doing finals and assignments at school till the evening of the 22nd. Emily got done with college finals with a week to spare before Christmas, which was one of the perks of no longer being in high school, I suppose. She hung out with friends who'd all come home for the holidays, and helped with shopping and wrapping and baking. It was fun to have a full house again.
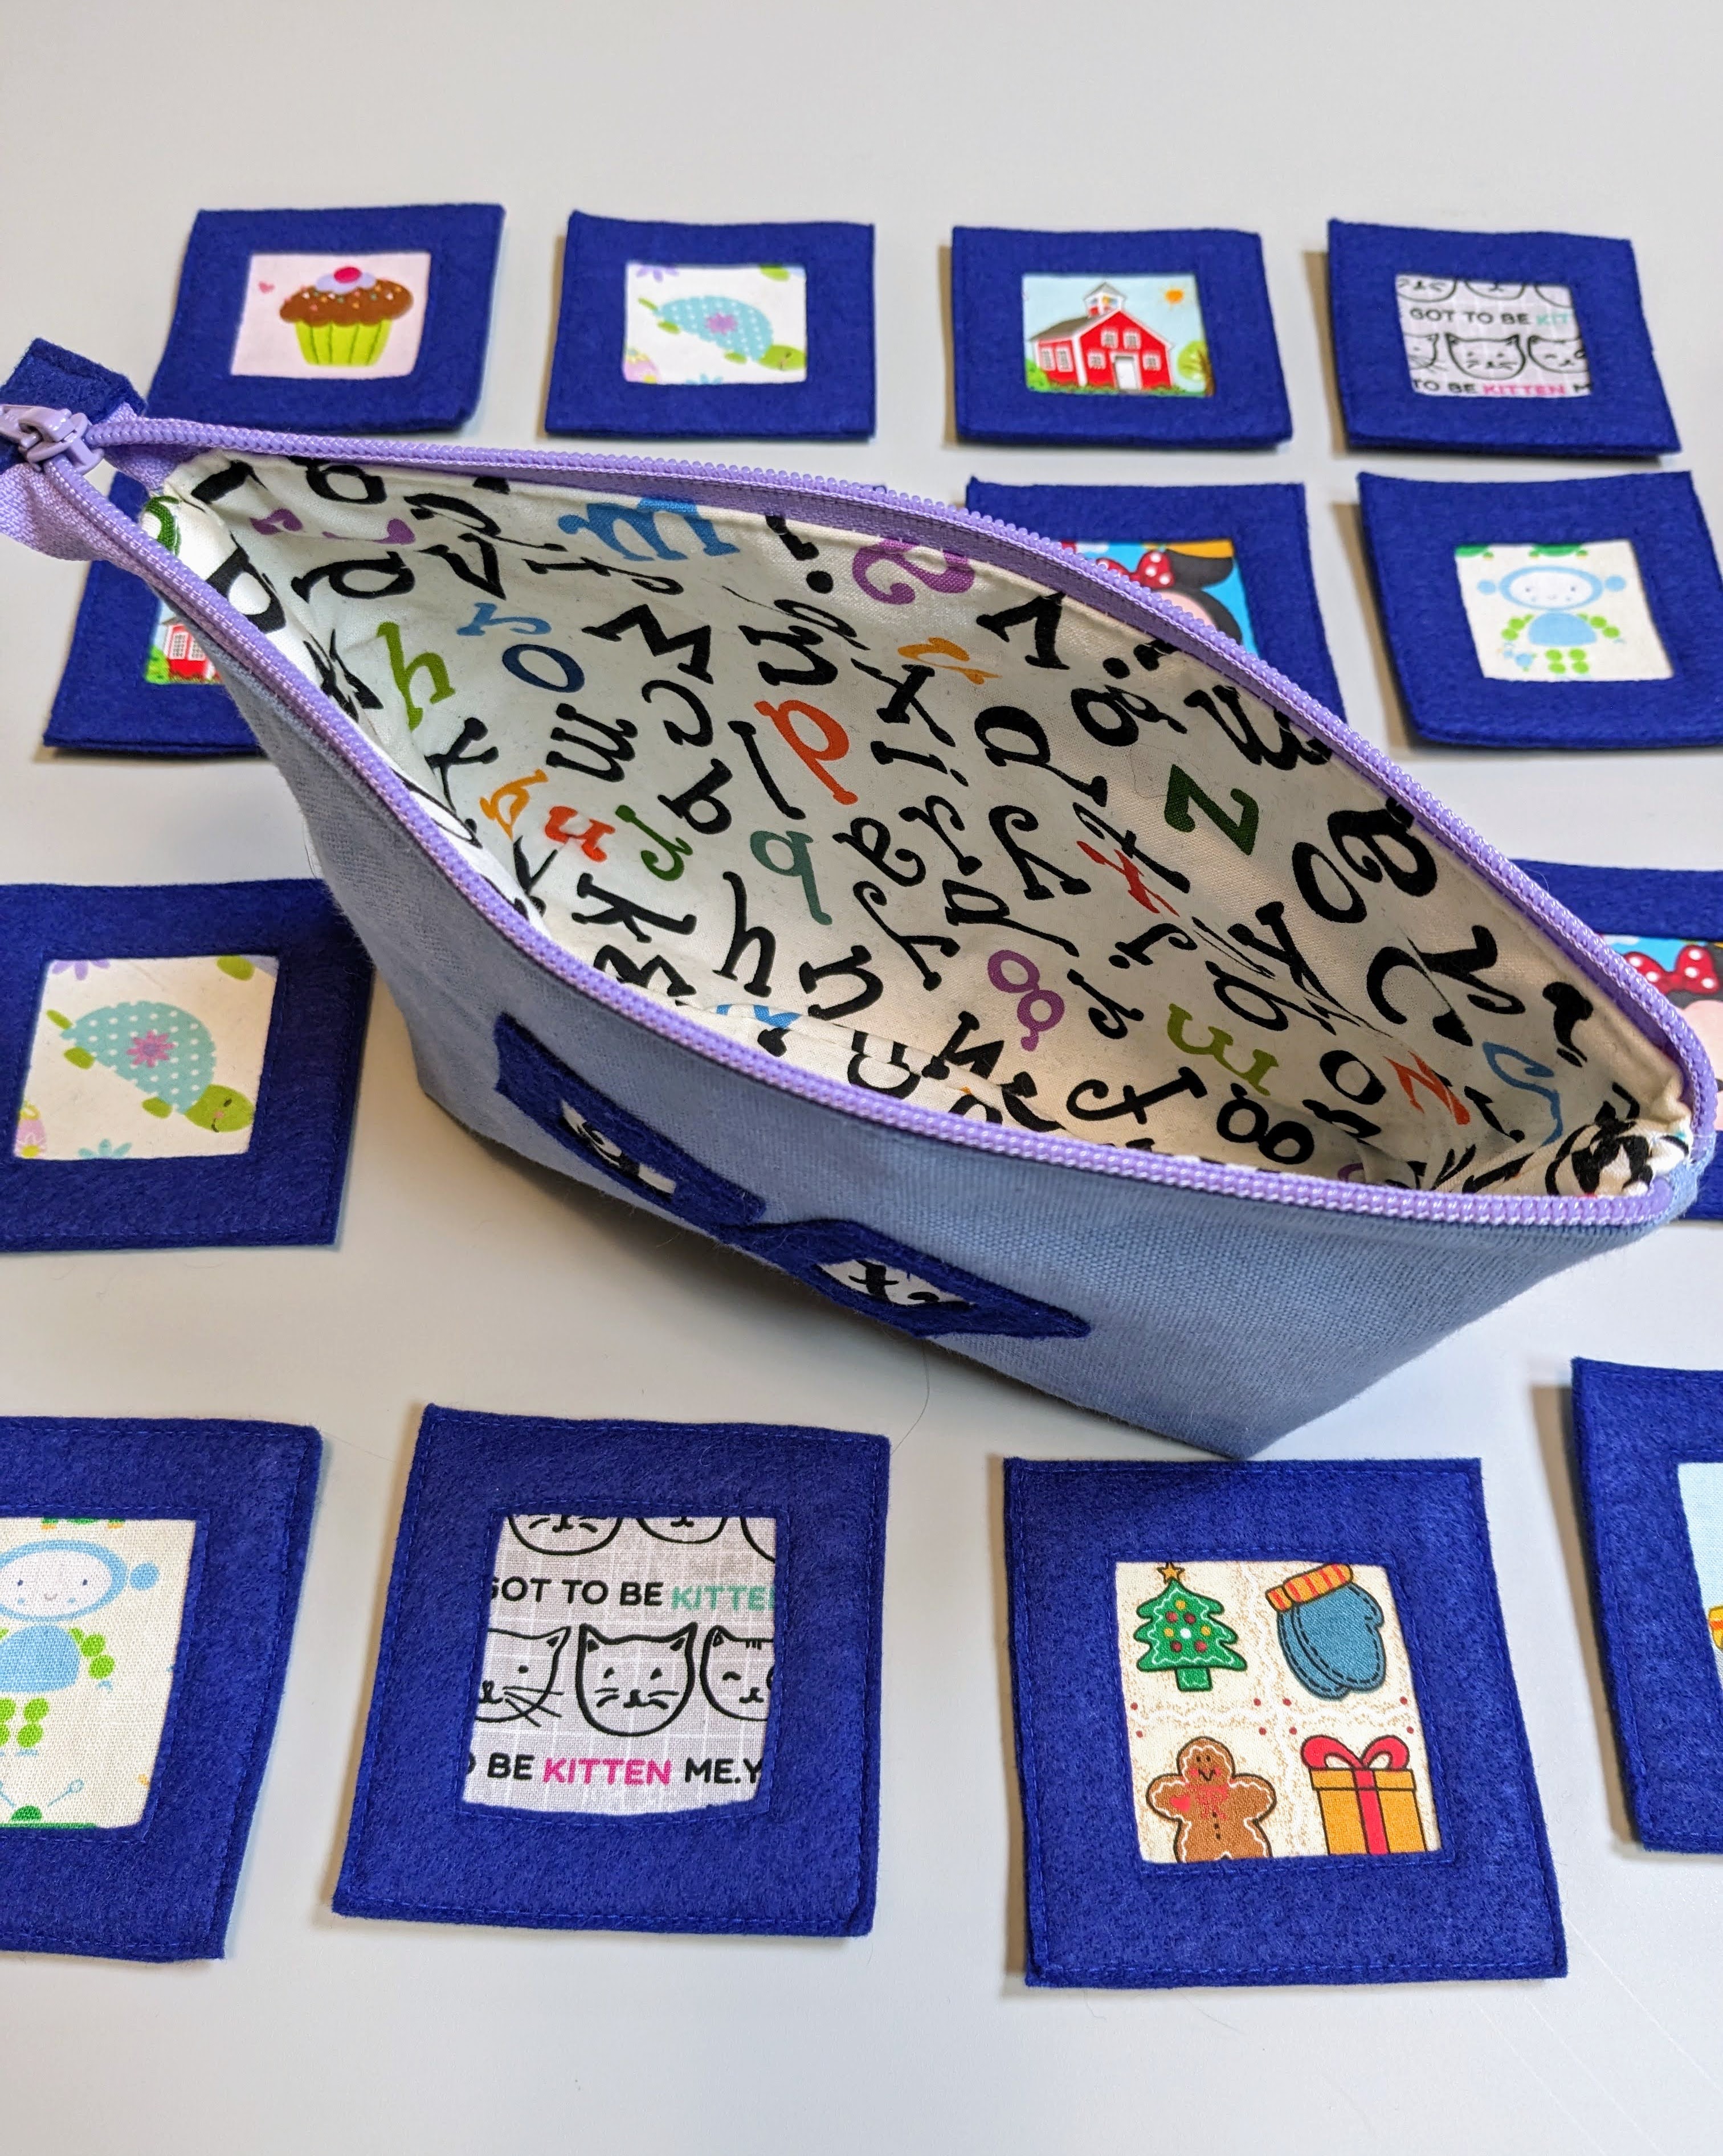
I only made two gifts this year (and bought everything else). This one was a matching game for my nephew, who turns four in January. I remember seeing these all over the internet, but only when my own kids were already far too old for matching games. People made these with fabric scraps, and you were supposed to match the fabric prints in pairs. The photos were gorgeous, because the prints were designer and gorgeous, but I did wonder about the interest levels of toddlers and, say, damask prints. Or plaids. So I dug into my novelty print stack of cottons instead, and picked twelve with what I thought were slightly more fun motifs for a little boy.
And also thought I'd do a tutorial since I haven't done one in a long time. It seems strange to be sewing for children after so many years - I've missed the heady excitement of toymaking, and getting into the psyche of a child in order to create some crazy plaything. So to have a four-year-old in the extended family is a wonderful gift.
Step 1
So, to start, you'll need
- Felt - I used acrylic felt off the bolt (not the single 8" x 12" craft sheets, which are horribly pill-y) because it was what I had on hand. If you feel especially splurgy, wool or wool-blend felt are even better. Decide on the number of pairs you want in your game - you will ultimately need 4 times that number of felt squares. Mine were 3" x 3". In my game, there are 12 pairs, or 24 game pieces in total, so I'm going to use these numbers throughout the tutorial. Therefore, I would ultimately need 48 squares. If you are a precise cutter, go ahead and cut out all 48 before sewing. But if you're the sort whose edges don't always line up when you stack layers together, trust me and just cut out half of that, (so 24) and leave the remaining half uncut for now. Scroll down to Step 4 for further instructions if you're curious and want to skip ahead to find out why.
- 12 pairs of print fabric squares (24 in total), a little smaller than the felt squares. Mine were about 2-3/4" x 2-3/4".
- Interfacing for each of the print fabric squares, which are optional but which I highly recommend because the cotton can get pretty floppy. I used some Pellon Craft Fuse, but any medium-weight fusible interfacing would do. I cut 24 squares that matched the fabric squares, and ironed each to the wrong side of one fabric square.

Step 2
In the picture above, the felt squares have windows cut out of them, and this next photo shows how I did mine: fold each square in half along the diagonal to get a folded triangle. Cut out a smaller triangle to leave a V that's about 1/2" - 5/8" thick. When you unfold the V, you'll get a square window frame. I found this to be the fastest method to getting all 24 cut out. Discard the smaller squares. These 24 window panes are the fronts of the game pieces. If you'd cut out all 48 felt squares in the beginning, remember that only half of those (24) will need windows cut out, and the other half, which will be the backs of the game pieces, will remain whole.

Step 3
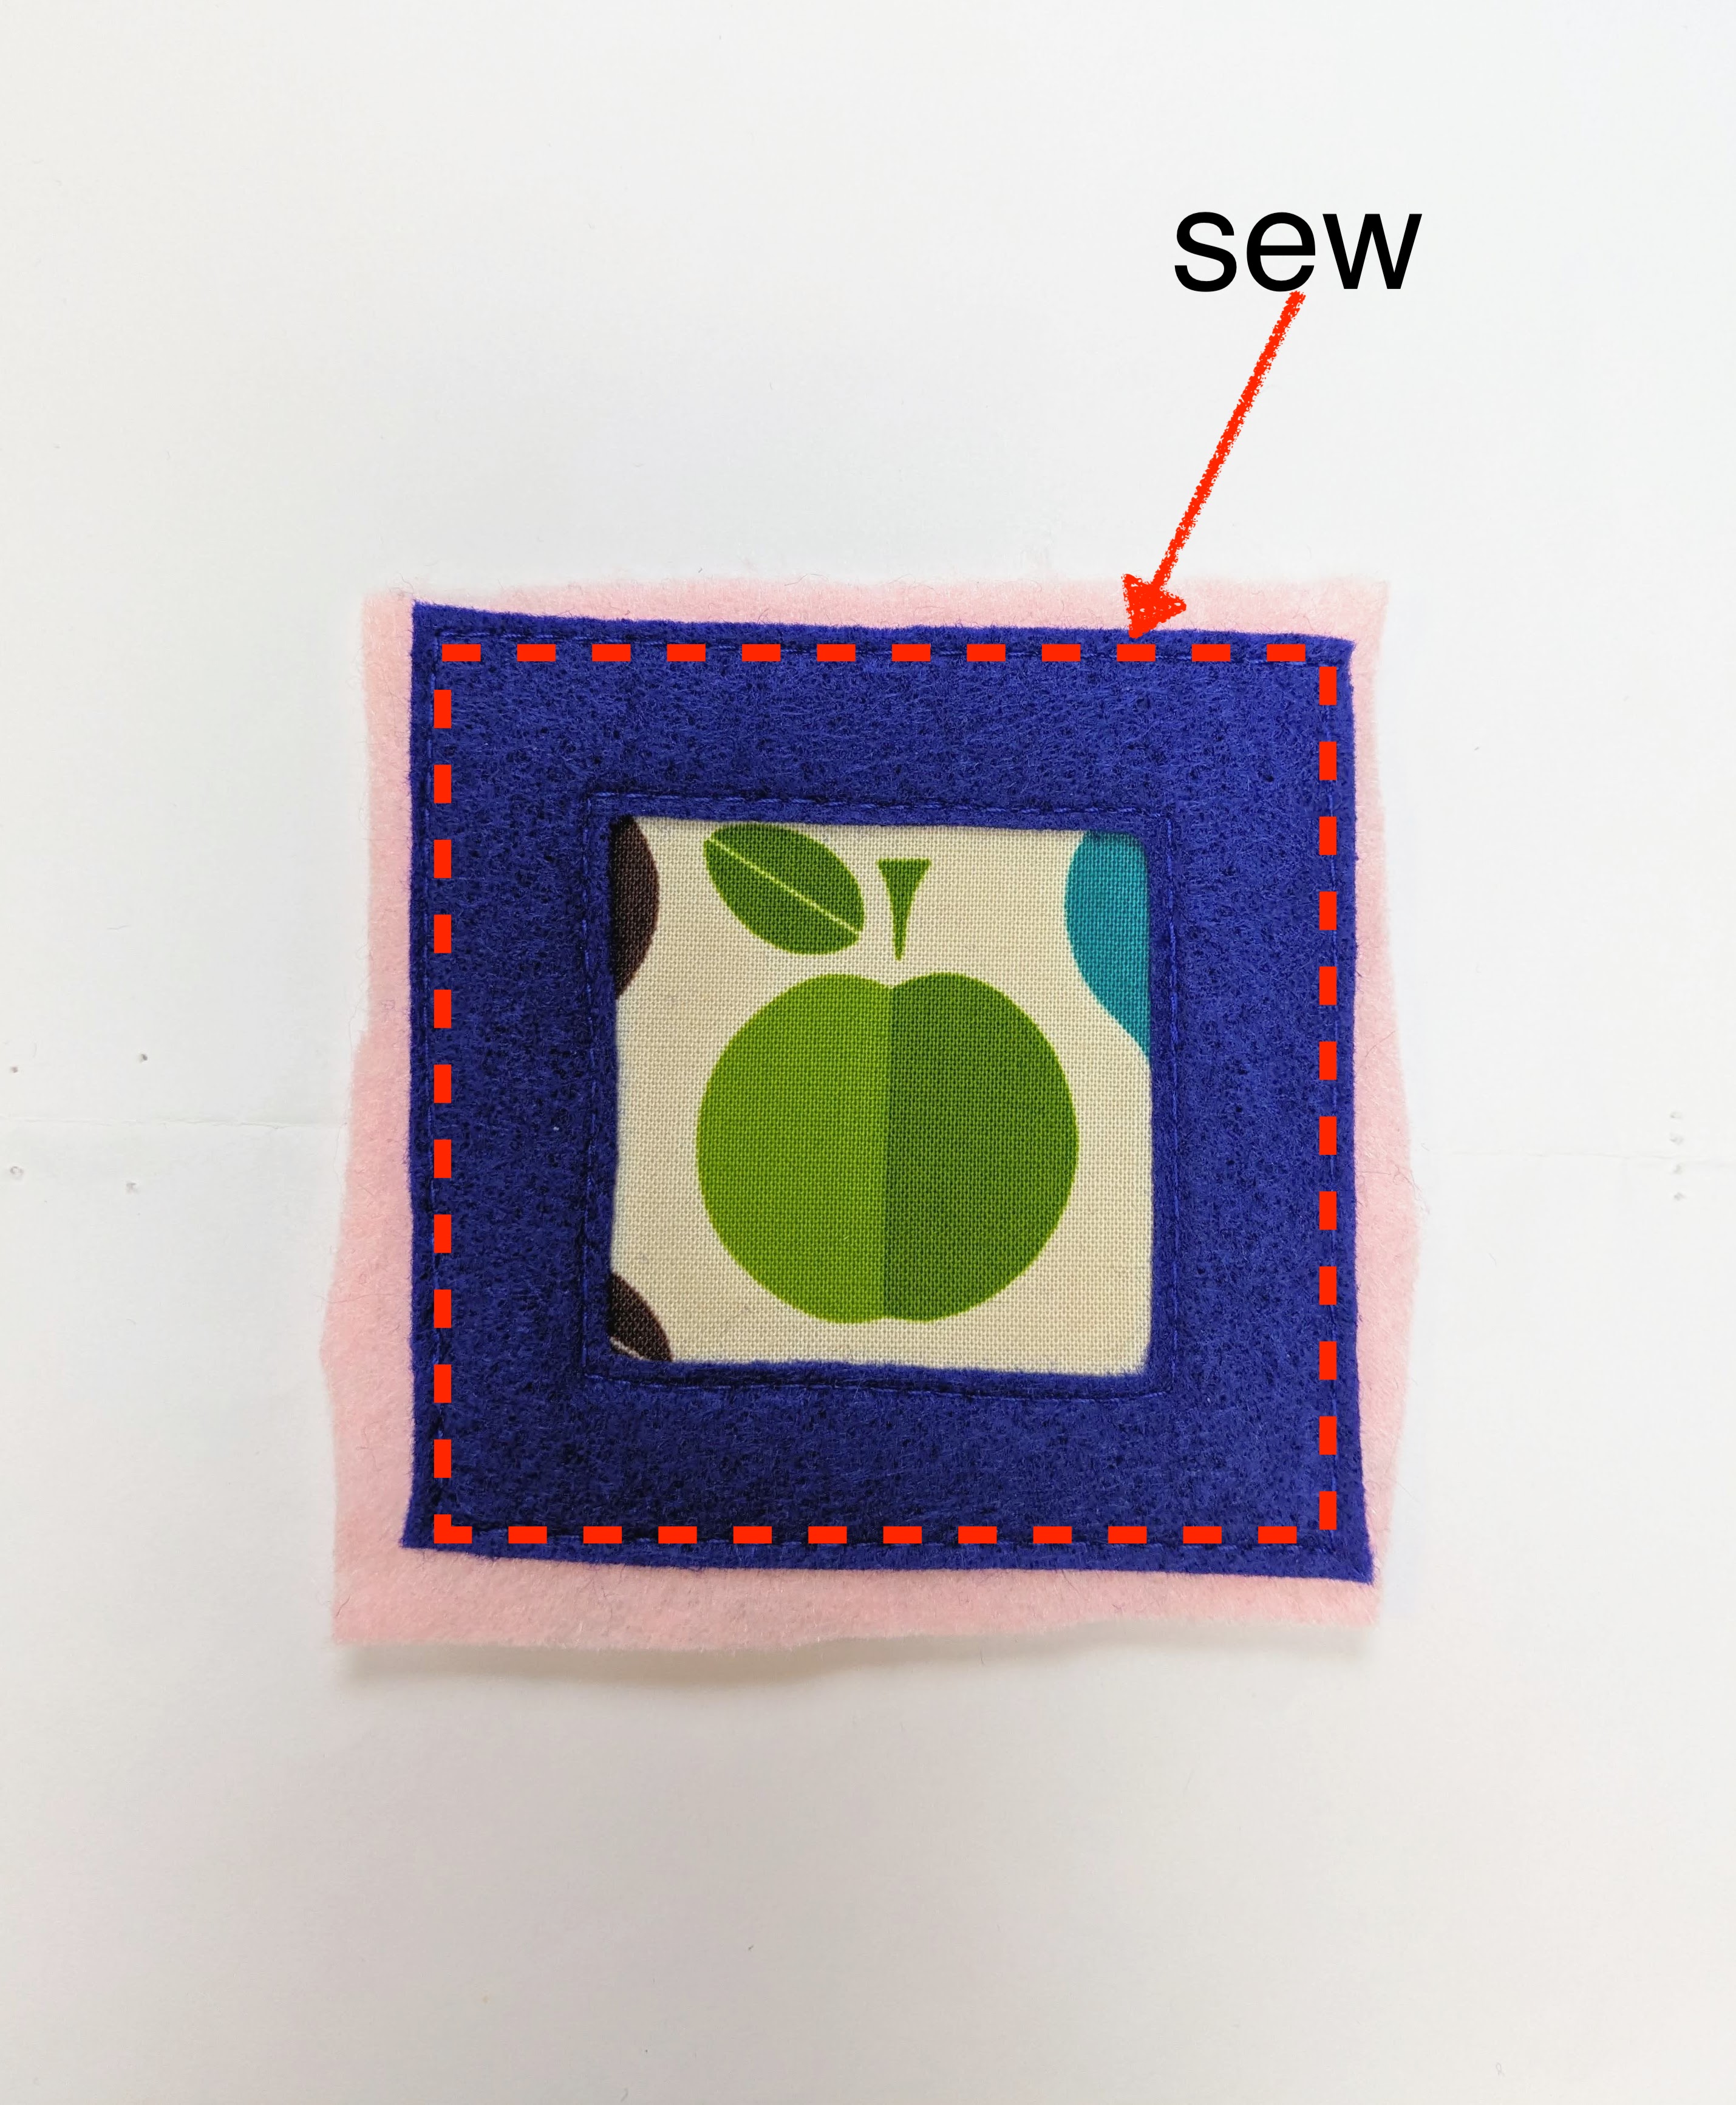
Here's how to make one of the game pieces. Take one window frame felt square and place it over one of the stabilized fabric squares.

Sew (edge-stitch) around the window, through all layers.

Here's the wrong side, to show you both the stitching, and how much smaller the cotton fabric is than the felt square. The reason we want the cotton piece smaller is so that when the back layer is added, none of the cotton layer will show around the edges. It's neater, for one. For another, we don't want bits peeking out as spoilers during the game.

Step 4
Next, add the back felt piece. If you'd cut out all 48 felt squares earlier, this is when you'll just place one of the back squares (with no window cut out) on the WS of the front piece, perfectly align all sides, and sew around the outer edge. If, however, you'd gone with my cryptic instructions and cut only 24 earlier, this is how I sew stacked layers together so that their sides align perfectly and the edge-stitching is astoundingly even all around: I cut the back piece a little bigger than the front piece, a fancy technique my kids use to call "bubble cutting" from their preschool days. In the picture below, I used a pink piece of felt for the back piece for visibility - you'll of course be using a color that matches the front.
After edge-stitching, trim away the excess fabric so that the back pink piece exactly matches the front.

Voila - supernaturally even edge-stitching even on the back.

When mass-producing, I often sew all the front pieces on even larger back pieces and then cut everything out at the end. In this case, I cut strips of felt that were about 3-1/4" wide and sewed front pieces on them, then cut the finished game pieces apart.

It was oddly satisfying to sit on the couch after, meditatively cutting up those strips and trimming around all those squares.

I also made a pouch for storing the game pieces.

The pouch is this one, except with a darted bottom rather than a separate base - I forget the dimensions I used. I just measured around the stack of game pieces to decide how big to make it.

Found some alphabet fabric in my stash for the lining, and to make the initials on the front.
When I was halfway through this project, I had a fun memory from when I was about five. My mom was in the hospital about to give birth to my brother, and Dad and I were waiting at home because in those days, fathers weren't allowed in birthing rooms in Singapore, or anywhere else, I imagine. To occupy ourselves, he played a matching game with me using a deck of playing cards spread out all over the bed. I remember that we'd called it a Memory Game back then. It's been five years since Dad died, and I'm at the point in my grief when I can enjoy memories without feeling gut-punched, so this was a lovely one from a time when we were celebrating new life and excited about new beginnings. A fitting thought to carry into 2024, I thought. May this year bring hope, new beginnings and the making of wonderful memories!

Thanks LiEr,
ReplyDeleteAs always it is lovely to see your name in my inbox. I am glad that you had an especially good Christmas. Thank you for sharing the memory game it is a lovely idea.
Looking forward to many more posts from you
Happy New Year
From
Ann
in Cornwall England
It's a nice milestone in grief, to be able to enjoy memories without the gut punch. That's a lovely memory.
ReplyDeleteVery cute toy, and fantastic tutorial, as always. I love your mass producing tips. I think this was the first year I didn't make a handmade gift, although my 11yo made a lot and my 14yo also made several.
Happy new year, friend! My youngest crammed some crazy handmade gifts overnight, which I'm still slightly in awe of. Both of the project and the dogged determination , I mean. I think she more than made up for the rest of the family's more relaxed approach to handmade this past Christmas! I will share that in the next post!
Delete