

Each time I'm back in Singapore, I feel less and less the need to stock up on sewing stuff to bring home to Minnesota. I'm not sure whether I'm glad or not about this. On the one hand, it's indicative that I'm increasingly settled here, and more knowledgeable of places to buy the supplies and materials I need. On the other hand, it might mean that I don't hold in as high esteem, my old hunting ground(s) from the exciting(er) sewing days of my youth.
On this recent trip, for instance, I didn't buy any fabric. I realized that I barely touched the fabric I bought on my last trip there. I also had a very short shopping list, comprising mostly hardware and electronic components for other hobbies. All that said, it was still extremely enjoyable to browse and pick up loads of random Might Be Usefuls and Oh How Quaints and Cheaper Heres and other general nonsense. Here are some samples of what I brought home.
At Textile Centre, my favorite wholesale haberdashery mall (for want of a better word - there are only four really relevant stores there), I bought velcro - indigo, raspberry, dandelion, charcoal, peacock and sky (the lighting isn't accurate);

polka-dot bias tape - yes, I can make my own,
but for just over US$1 a card..... duh!
(and I've already used one on my hamper);
but for just over US$1 a card..... duh!
(and I've already used one on my hamper);
thick grosgrain binding for wallets and bags;

satin-y ric rac - the wavy ones are about US$3.50 and the straight ones are about US$4.80. For 36 yards. 36!!!

I haven't been able to find the straight trims here in the US, incidentally. So I buy them whenever I'm in Singapore,

to make frog buttons like these;

elastic by the card (about US$1.70 for 12 yards) and fold-over elastic in multiple colors, widths and textures - the ivory one in the photo has a velvet finish.

random notions - grease/wax pencils, chalk pencils, machine needles, and chalk markers. The Pfaff bobbins were bought cheap online, in bulk, by Dad and Mum, who gave me just part of their shipment.

I've only ever used actual chalk chunks, but this plastic adaptation is much neater. You slide out the compartment that's filled with powdered chalk (comes in yellow, white, blue and pink) and remove the stopper lid, then replace the chalk compartment.

See that tiny little toothed wheel at the tip?
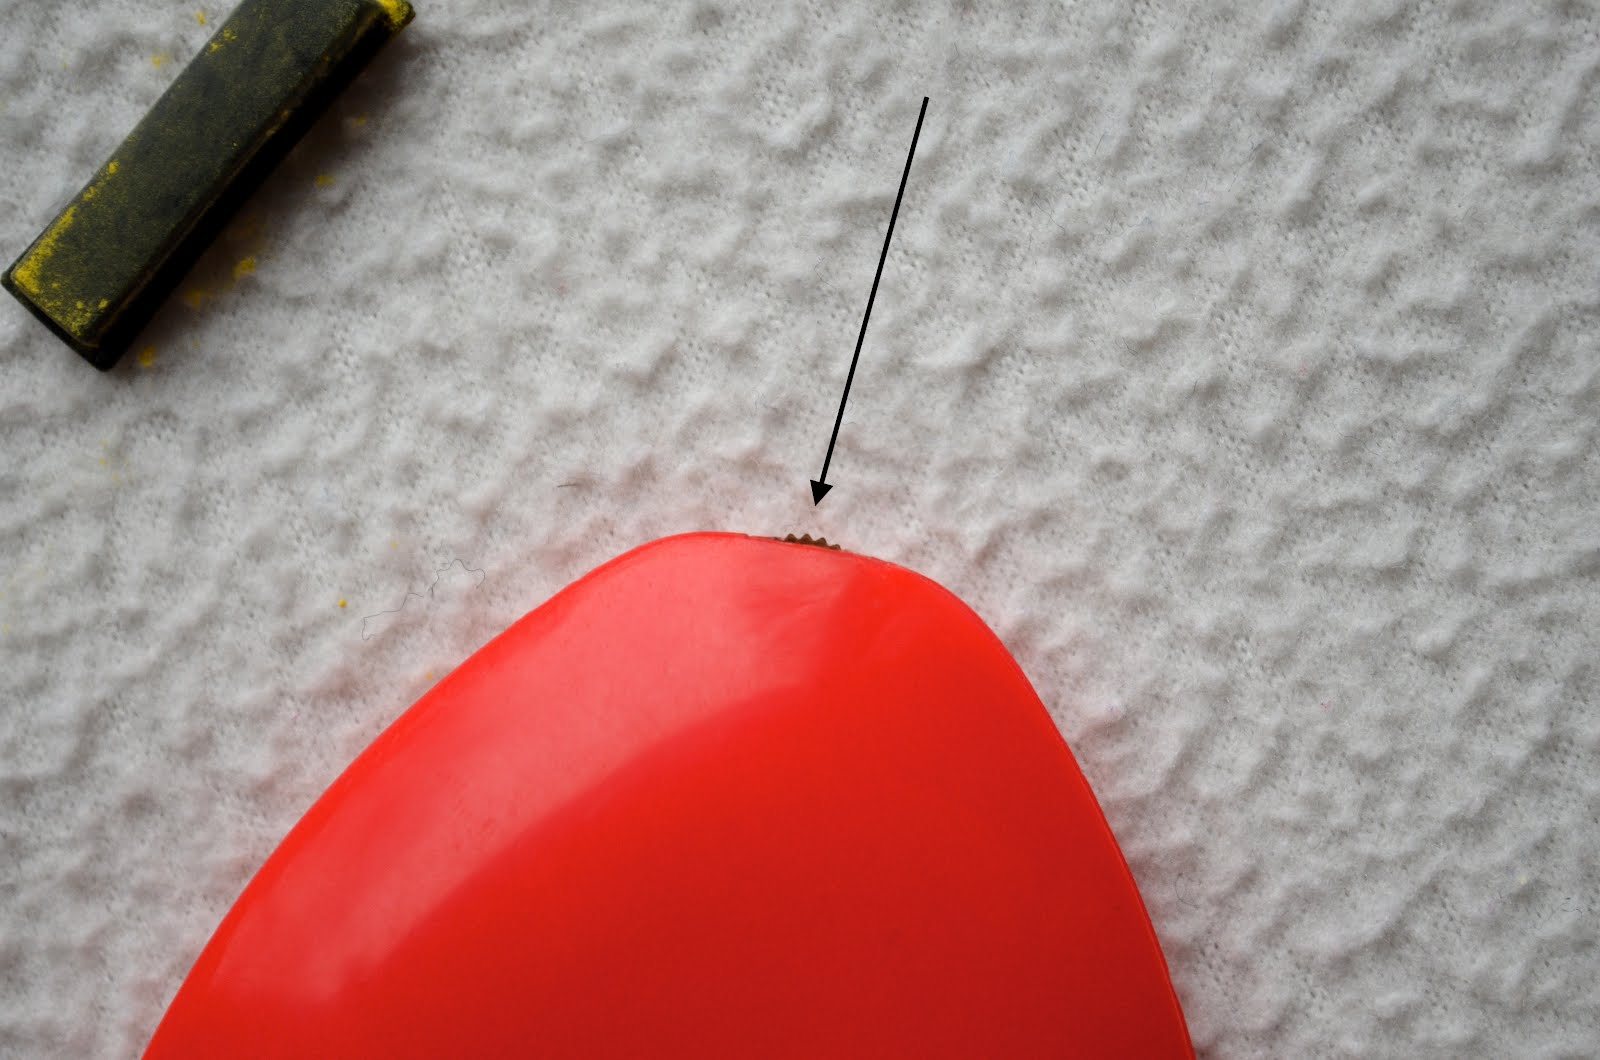
It dispenses a fine line of chalk - much more precise and the roller action is better than the sliding method of the traditional chalk/markers because the fabric doesn't shift and produce skipped/feathery lines. I'm planning to grind up my old tailor's chalk fragments for refills.

And then there's Daiso. Always a lot of fun, Daiso-, especially if you go there only once every year or two. Between Daiso and the independently-owned stationery stores in the various housing estate strip malls, a person can bring home an entire suitcase of Cuteville without a strain on the pocket.
Here's a fun little pill shaver - it removes fuzzy bits from fabric surfaces.

See?

Some bento accessories - toothpicks:

Little pop-up (and squish-down) drinking cups for kids:

Teeny little food cutters:

Paper embosser:

Binder clips:

And then there were the gifts from friends!
Check out these mittens uh, I mean gloves (duh) my friend Eunice got for Kate. Bought, since Eunice doesn't knit. But -eeeek - that toadstool!!!

Polka-dot webbing (thanks, J!)


Personalized font fabric. Eeeeeeeee!
So much potential!
She prints these for her art folios.
Aren't they brilliant?
Kaftan blouse made by Jen. Drapey and gorgeous!

Made of one rectangle and two seams.
Hand-stitched, except for the rolled-hem edge finishing.


And Auntie Laura made these butterfly hair clips for the girls:

There's more, but I started to feel guilty making you all feel left out like this. So let's move on to the giveaways! There are TWO giveaways, so read carefully.
Giveaway #1:
While I was out shopping, I thought of you guys. Yes, I did! I thought I'd put together a little package of things that reminded me of this trip, and send it out to one of you:

- Two expandable cups
- Eight binder clips
- Food picks
- Drafting pencil
- That fancy chalk marker
- A set of blank peekaboo cards you can use with your surplus stickers.
- Three one-yard lengths of trim:

Giveaway #2:
It's funny how every single friend or family member who made plans to meet us would ask what food they could bring on their visit. Never magazines, or books, or toys. It's always food, because it's a fact that Singaporeans out of the country miss their food. Someone once said that if a Singaporean overseas claims to miss family more than food, they're liars. Definitely some truth in that.
Being back in Singapore (and Asia in general) also reminds me of cute food. Like bento-cute. This was the girls' bento lunch one day last week, just for fun. I don't do bento lunches often, so that when I do, it's super-extra novel and thrilling for the girls. OK, those Doritos aren't exactly healthy, but well. Those white things are coconut cookies, incidentally. They're Chinese New Year staples back in Singapore (and Malaysia). We call them kueh bangkit.


If bento is new to you, here are some reasons to try it:
- It's fun - both for the person preparing it, and the one eating it.
- It encourages picky eaters to eat what they don't usually like e.g. vegetables.
- It encourages picky eaters to try new foods introduced and presented in an interesting way.
- The portions are controlled (since they're packed in a box, and often in compartments therein) so you can't overeat.
Need more inspiration? Here are some ideas from Bento USA, which stocks an awesome variety of bento tools, boxes and accessories and has ongoing promotions, giveaways and contests. Go visit their store, their Facebook page or sign up for their twitter feed to be kept updated.

JeeJee at Bento USA is giving away some three bento items (valued at $30) on ikatbag to get you started on your bento meals! Thank you, JeeJee!
Here they are:

Set of bento plate cutters and rice mould

Two-tiered panda bento lunchbox

Animal food picks
And Bento USA and I will ship internationally, so anyone in the world can enter!
For a chance to win either the Singapore giveaway or the Bento USA giveaway, you need to
- leave a comment, completing this sentence: "At the first chance I get, the country I'd like most to visit is..... (and tell me why)",
- provide an email address (or a working link to one) where we can contact you if you win, and
- leave your comment by midnight Friday 2 March 2012
I'll draw two commentors at random on Saturday morning - one will win the Singapore package and the other will win the Bento USA package. Good luck, everyone!


