

Welcome to the making of winter hats!
I've been meaning to make these hats since I made the kids their fleece mittens. Then suddenly two whole years went by and now it's winter again and they still had no hats. Worse, they'd outgrown their current hats, which now perch atop their heads like the tips of bullets. So I finally did it. I could've bought them new hats, of course, especially since Old Navy was selling off their fleece hats at something like $3 apiece. But I have a vast remnant fleece stash, thanks to all the anti-hypothermia Halloween costume-making, so I decided that, for once, I would choose handmaking over buying.
It turned out that hatmaking for the girls was so fast and fun (and so effective in reducing my fleece stash) that I made six, all different and thought they were an easy enough project to document here on the blog. I made all six hats from two patterns and I'll split the making into two posts - one post for each pattern. At the end of the posts I'll share the pattern templates and a cheat sheet, plus a theoretical construct for two more hats - so eight in total.
Some notes before we begin:
These are the two patterns:
 and
and
While nothing beats the fit of a knitted or crocheted hat, the fabric versions can still be pretty decent if properly drafted. It is important that both fabrics be stretchy. I used regular fleece for the outer layer and cotton knit (jersey or good quality interlock) for the lining. The pattern pieces must be laid out so that the stretch direction of the fabric is as shown:

I wouldn't do this layout on the bias of already-stretchy fabric, because it then stretches both too much and too erratically.
Next, simply because all the hats are fully lined, they are theoretically reversible. Feel free to throw rotten fruit at me but I personally think reversibility in sewing projects is somewhat overrated. I mean, consider this: anything is reversible if it has no raw edges visible on either side and it is overall symmetrical to both sides. So if you can find a way to fully line something, so that the inside is as right-side-looking as the outside, it is automatically reversible. However novel it sounds, the truth is that most of us use only one side of most reversible items. At least, I do - I have lots of reversible stuff - cardigans, bags, blankets, for instance, and I almost always prefer one side over the other. Anyway, I apologize for being a party pooper but I just wanted to make the point that reversibility is not a big deal. What's more important in the grand world of tailoring is that the inside of an item (e.g. a garment, bag or hat) be as well-finished as possible. If that means all raw edges are tucked away between the fabric layers and the item is elevated to Reversible status, then so be it. But it's not magic or clever or amazing, okay? It's just the fortuitous side-effect of good tailoring.
Related to raw edges being tucked away, we're making most of our hats using the turn-everything-right-side-out-through-a-hole-in-the-lining method. This will be clear in the photos later, but you will need to remember to ALWAYS leave a hole in one of the lining seams for this.
Let's get started.
We are working with just this pattern piece:
which I drafted by measuring my kids' heads at various positions and dividing that number by 6.

And don't worry - at the end of the next post, you'll get the template in two sizes, if you're too lazy to draft your own.
From this pattern (let's call it Pattern A), I made three (of many, many other possible) designs:


They are all cut from that same Pattern A, which was either left full-length or chopped shorter so that a band of desired width could be added to the bottom. You'll need to cut six pieces of fabric from that Pattern A to make a full hat.
Here are some pointers to help you get the best results in your sewing.
First, when you join those six panels together, this is how your stitching lines should meet:

Note that the two stitching lines meet at a point; they do not cross each other to extend to the edge of the fabric. This will allow you to press open the seams at the top to get a neat point where all six panels will eventually meet.
Next, you will get good results if you sew half a hat at a time and then join both halves together. This means you'll sew three panels together to make a half-hat. Then repeat with the other three panels. Then place both half-hats with their right sides together, line up those funny meeting-points we mentioned in the paragraph above and sew those two half-hats together.

This is the result - it's especially easy to get a beautiful meeting point with thinner fabric but fleece is quite cooperative, too. The hat in the picture below does not have a perfect meeting point but it's a good example to show you because you can clearly see which three panels belong to which half-hat piece and thus visualize how those two half-hat pieces came together to make the full hat.

Alright! Some specifics now.
To make this first hat

you assemble the lining - six full-length panels with a hole left in one seam for turning out later.

Then you assemble the six-paneled crown of the outer fleece layer and attach the band to it, right sides together. Note that the band is sewn into a cylinder first, before the circumference of that is attached to the (matching) circumference of the crown.

When you turn it right side out, you get the full outer hat.

Turn that upside down and tuck it into the lining, so that the right sides of both layers are together. Sew around the rim to attach both layers together.

Turn out through that hole you left in the lining and hand-stitch the hole closed. Don't machine-stitch the hole shut if you want your hat to be truly reversible - you'd be able to spot that hideously-raised machine-stitched seam a mile away. The last thing I did is to discreetly stitch the two layers together at that funny meeting point, so the lining doesn't separate from the outer layer when the hat is worn.
Here is that hat - right side and lining-side out:


And here it is on Emily. It is meant to be worn as is, without folding the band up to make a cuff (which would expose the lining).

The next hat is very similar to that earlier one,

except that the band is double-layered so it can be folded up to make a cuff.

The lining in this case is not made from the full-length pattern - both the outer fleece and lining have a crown portion, connected to each other by the folded band:


You start the same way as with the first hat - sew the lining crown (that's the polka dotted thing at the bottom of the photo) and the outer fleece crown (that's the circus-looking rainbow fleece thing with the pompom). Then sew the cylindrical band to the outer fleece crown, just as you did with the first hat.

Next, nest the lining crown in the open end of the band, right sides together.

Sew around the circumference of the lining crown to make a completely sealed capsule. Hopefully, you will have remembered to leave a hole in the lining, yes? If not, unpick a seam now to make one.

Now turn everything out through that hole in the lining, stitch the lining hole shut and also stitch both layers of the hat together at the meeting points of the six panels. The band of the hat will automatically fold itself along its midline so that half its width is on the outside of the hat and the other half is on the inside.

This way, you can fold the band into a cuff if you want to, and not expose the lining.

Are you curious about the pompom?

This was a yarn one I made to match the rainbowness of the hat. I left the ties of the pompom long and machine-sewed them into the seam of the hat. Much more secure than hand-stitching the pompom on.
If you're not into yarn pompoms, you can make fleece ones. Cut long thin strips of fleece (mine were about 1/4" wide) and loop them as shown in the left picture below. Sew across their midpoints with the sewing machine to prevent later slipping. Then tie their middles together in a bunch as shown in the right picture.


Sew those ties into the seam of the hat when you're assembling the panels together. You can leave the final pompom loopy or snip through the loops like so:

The third hat is a bit fancier in that, in addition to the band-and-cuff, it also has ear flaps with braids.

The braids are literally three strips of fleece plaited together and then tied at the ends. The ear flaps are assembled by stitching two flaps, right side together, with an upside-down braid sandwiched between them:

Like the earlier rainbow-hat-with-the-band, both layers have a six-paneled crown. However, the band is attached differently to accomodate the ear flaps. First make the lining crown (remember to leave a hole in one of the seams!). Here is the lining crown being tried on Kate for fit. Two seconds later, her hand has whipped it off and tossed it on the ground,

which reminds me to remind you that you should do fittings on the head of your child as you sew. Different materials stretch differently around heads (not to mention that your children's heads are probably different from mine) and you might find yourself needing to let out or take in ease at the various seams to get the fit you want.
Moving on now.
The outer crown (solid pink) is next assembled. Then the band is
- sewn into a cylinder
- folded half-width lengthwise (i.e. double layered)
- sewn as a double-layer onto the circumference of the fleece crown, as shown in the left photo below.
Then the ear flaps are sewn, upside down, to the outside of the band, as shown.


Next, the entire outer hat is nested in the lining layer, so that the right sides of both layers are together. Sew around the circumference to connect the two layers together.

Turn right side out through the hole in the lining, stitch shut the hole and stitch the two layers together at the meeting point of the six panels - standard procedure for finishing.
Here is the completed hat - right side (with band folded up into a cuff) and lining-side. This is not a truly reversible hat, obviously - the ear flaps are uselessly situated outside the band in the right photo.


The band can be rolled/folded wider or narrower to expose less or more of the ear flaps, without exposing the lining.

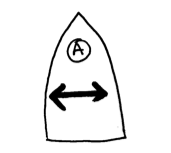
The next hat (ignore the Roman numeral 7 - it will make sense by the next post) is a theoretical variation of this same Pattern A. I didn't actually make a sample, so it's just sketches. This is one of those pointy Noddy sleeping-cap designs - you can easily make it two-pointed as well as one.

The important thing to note is that the lining layer should stay as a six-paneled rounded crown, so that when the hat is worn, the wearer's head won't get pushed all the way up to the apex of the hat and get lost in it. The outer layer of the hat is just two curved/contoured triangles whose base is half the head circumference (making the full head circumference when both halves are joined together). Make it as tall as you like. Sew the lining crown and the outer layer together at their rims as with the first, cuff-less hat we made.
So - four different hats based on Pattern A. That brings us to the end of Part One. See you back for Part Two, in which we make four more hats from another pattern and give you the templates!

Beautiful hats and tutorial!
ReplyDeleteI think I'll just keep buying mine though... :-)
(I've often thought the very same thing about reversible things.)
I totally loved your eloquent rant on reversibility. "It's just the fortuitous side-effect of good tailoring." Amen!
ReplyDeleteAnd thank you for taking the time to give out the instructions, these hats are darling!
Your hats are adorable! Another thing for my to-do list. :)
ReplyDeleteYour girls (and their hats) ARE SO BEAUTIFUL!!! Thank you for sharing. :-)
ReplyDeleteThose hats look very fun to make! I think I need to make one for myself! And then Miss C will want one, too, of course. :) I wonder if Jess would want one....
ReplyDeleteI agree that reversibility is overrated, but perfectly finished interiors are dreadfully underrated. I'd much rather have a plain but lovely-on-the-inside garment than a detailed, stunning garment with a ragged interior.
ReplyDeleteHats, love them. I think my daughters would be very happy if I made them some hats like these. =)
Wow, what a lot of instructions for some very cute hats. Thanks for writing that all out! Cute little girl! I think I still have time to make a couple for Christmas for my grandsons.
ReplyDeleteJan
PS got here from craft gossip.
Great hats! I'm sure my kids will appreciate new hats too. Your girls sure look like they are enjoying the snow.
ReplyDeleteAren't you glad that we got enough snow for the pretty "outside where we need hats" shots! I just made a hat or two myself!
ReplyDeleteWhat seam allowance are you using?
ReplyDeleteSchon A Gross Design: I typically use 1/4" SA when sewing fleece. That said, the templates that accompany this tutorial (found in the "Part II" post) DO NOT have SA included . You will need to add your own SA to the templates, and you can add whatever SA you are used to e.g. 1/4", 3/8", 1 cm, 1/2", etc.
DeleteThese hats are adorable! The patterns won't download for me. It says they are no longer there. 😢 I really wanted to make these for my grandsons.
ReplyDeletectap: You're right - the old link was funky. Seems something was up with the file site. I've updated the link, so it should work now. Happy sewing!
DeleteIs the head band cut so that the greatest amount of stretch goes around the circumference of the head?
ReplyDeleteUnknown: yes.
Delete